Barefoot Technologies – Setup and Training Guide
Dec 2019.
The most current articles will be in the hyperlinks below. Please also remember that each client system is unique so these articles, whilst helpful, may not completely describe things the way they are set up in your system.
Table of
contents.
A note on how Barefoot protects your data. Please read.
How to set up users within Agent - Watch video here. Support article here. https://support.barefoot.com/solution/articles/6000175456-video-how-to-set-up-a-new-user
DataPorting 101
Property Related Items
Setting up Custom Amenities
Batch Updating Properties Support Article here: https://support.barefoot.com/a/solutions/articles/6000143419
Setting Provisions on a Property. Support Article here: https://support.barefoot.com/a/solutions/articles/6000121197
Setting up Co-Owners Support Article here: https://support.barefoot.com/a/solutions/articles/6000189698
Changing an Owner Support Article here: https://support.barefoot.com/a/solutions/articles/6000190014
Setting up pictures Support Article here: https://support.barefoot.com/a/solutions/articles/6000189700
Descriptions
Comments
Minimum Stay
Requirements
Property Search Functions - Property Search & Availability Chart Support Article here: https://support.barefoot.com/a/solutions/articles/6000136763 and here https://support.barefoot.com/a/solutions/articles/6000123327
Vendors and Services.
Understanding the
relationships between services, vendors and the rate table.
Setting up vendors
Setting up Services
Assigning Services to specific vendors or even to an owner - per property Support Article here: https://support.barefoot.com/a/solutions/articles/6000104846
Mastering the Rate Table
Setting Up Rates
Support Article here:
https://support.barefoot.com/a/solutions/articles/6000136772
Property Unavailable Support Article here: https://support.barefoot.com/a/solutions/articles/6000195530
Letters - sending out documentation to Tenants and
Owners.
Template Letters
USING Template Letters
Combining Services within a letter. AKA "Bundling Charges"
Support Article here:
https://support.barefoot.com/a/solutions/articles/6000119833
How to actually DO stuff in Agent
How to generate searches
and do reservations in Barefoot
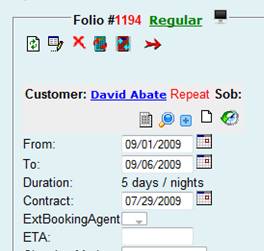
The Folio Itself
Folio vs. Quote
Adding Co-tenants
Editing Folios
Accounting
Updated. Printing 1099s Support Article here: https://support.barefoot.com/a/solutions/articles/6000108624
Trust Accounting 101
Important Concept – Due Dates
(Including Batch Management
How to email statements to owners Support Article here: https://support.barefoot.com/a/solutions/articles/6000184912
Receiving Payment in a
Folio
Recalculating the Folio Support Article here: https://support.barefoot.com/a/solutions/articles/6000190312
Adding
Charges
Upsell Items
Canceling a Folio
Sending out literature from
within a folio
Refunding Money
Folio Searching
Reports - Folio
reports, Arrival & Departure lists, Folio with Balance, Due Now,
Housekeeping, Source of business report and many more.
Barefoot Reports 101 - this is where you will find most reports
Editing Report Columns Support Article here: https://support.barefoot.com/a/solutions/articles/6000102296
Work Orders
Reminders
Credit Card Processing
Important information about keeping data secure and how Barefoot helps you.
There are SO many hackers, scammers, phishers out there today that keeping your data safe has become a full time job for some companies and a real concern for you, your owners and your tenants. Whilst no system is completely hack-proof, lets work together to make Agent a tough nut to crack and lets keep your data secure.
With that in mind, here is some information about how Barefoot keeps your data secure and some tips as to how you can help prevent unauthorized entry into your database.
-
Owner Social Security / Tax ID Numbers. Once you enter a SSN/TID, we encrypt this and only administrators can see these numbers. If you hover over Contacts and look at the drop-down menu and you see a field called "All Contacts" it means you are set up as an administrator. If you do not see that field, you are not an administrator and you cannot access this data.
-
Guest Credit Cards. Barefoot is "PCI Compliant" and we employ a method called "Tokenization" with our credit card vendors. When you take a credit card payment in Barefoot (or through your website), we send that card number off to the card processor - we do NOT store that number in Agent. The processor in return sends us a token number for use in later transactions. Next time you want to charge the same card, Barefoot will send the processor a request to "charge the card number associated with this token number" and the charge goes through.
SO, you can, with complete confidence, tell your guests that their credit card number is NOT stored in Barefoot and is completely safe. -
In Agent, practically everything you do leaves a record that captures your user name, date and time and what you did. So it is VERY important that you keep your login YOURS. Change your password frequently (Go into My Info and there is a choice there to change your password).
Should an employee leave your company - MAKE THEM INACTIVE immediately so they cannot access the system remotely. -
If you use a mobile device like a laptop - do not store your password(s) on this device in case it gets stolen.
Bottom line folks - we work hard to keep your data your own. Please do your share as well. Report any suspected breaches to Barefoot as soon as possible and together we can keep your data safe.
Basic Navigation within the Barefoot Agent System
![]()
Accounting – is where you can create batches to pay owners and vendors, do
bulk deposits and bank reconciliations and more.
Knowledge – is a bulletin-board type module where you can find some ‘how-to’ items as well as create your own database of user-shortcuts and tips.
Catalog – is where you manage a lot of the ‘behind-the-scenes’ stuff. This is where you will commonly go to manage your custom property, tenant and owner CRM fields as well as the place that you will write all your personalized letters. Things like minimum stay requirements and global rates (rates that apply to all properties) are set up here in the catalog.
Settings – is where a lot of system switches and configuration is done. It is wise to err on the side of caution when venturing here.
How to set up users within Agent
Note. Access control is not covered by this document. It is usually customization and will be set up to your specifications.
Each user within Agent gets their own user name and password.
Here are the steps involved to add a new
user.
Contacts > All Contacts >> Add New
Fill
in the user ID, last and first name plus any other relevant info. PLEASE add an
email address for every member.
Click the Update button to SAVE your
new Agent
Select the role you want them to have (manager, reservationist etc) from the Contact Type. (Click the Add button)
Click the Update button to save.
Use the drop-down menu > Set Password >> Change the password to whatever you want.
Click the Update button to save the password.
Click the User Information link on that page > Click VIEW
This will bring up the new Agent record. At the bottom of
the record is a box "Is Administrator". ONLY check this box and click Update
IF you want to enable this person to have administrator rights. (Should they
be able to SEE owner Social Security Numbers or add new users ? If not, they
should not be administrators). Click Update to save if you do add their
administrator rights.
Click the “Check In Office” link – a box comes up >> 99% of the time the Operating Account box will be checked - which is what you want. IF IT IS NOT CHECKED, please Check the box and click the Update button
e.
You are done. Each user can go to the “My Info” tab on the navigation bar
and change their own password.
Data Porting 101 – A survival guide for your valuable data.
Introduction
Barefoot has the ability to port data from many PMS systems. Typically this data is in the form of a .CSV or .XLS file.
Commonly, tenant information is ported, but owner records, property information, descriptions, pictures and much more can be ported into Barefoot. Typically rates are not ported. We also usually don’t port folios as entering them manually is GREAT practice for you and your staff
Typically two ports occur. A primary port that will capture most of the data, then a final port right at the point your new Barefoot system goes live, to capture any last minute additions to your records.
This document serves to train you on WHAT to look for once the porting has occurred so you may verify the accuracy of the data we capture.
Please note, data porting is not an exact science. There are many variables and even with the most accurate of data ports, there may still be some manual entry of data.
The
process is the same for the common three types of port. We match fields in the
spreadsheet (or whatever data file) to fields in Barefoot. This is done on a
best-effort approach and it is ESSENTIAL that you verify the accuracy of the
data.
Owner Data
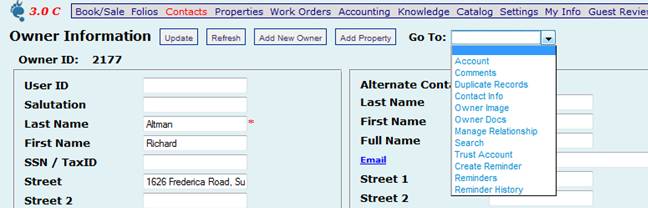
Log into Agent, hover your mouse over Contacts and click on Owners. This takes you to the Owner Search page. Click Search. This should bring a list of all your owners that got ported in. Click on any link to open the record.
There are two ‘types’ of data. Standard fields and Custom Fields. The custom fields will appear near the bottom of the owner record, usually under a “General” header.
Please review that the correct data appears in the appropriate boxes. Near the top is a “Goto” box. IF comments were ported, they should be captured in the Comment field. Click on the Goto box and click on Comments.
If property info was ported as well, the owners properties should be listed on this main owner record page as well.
The logic is that if ONE record is captured correctly, ALL the owner records should be good. Exceptions to this might include Co-owners on properties. Please verify all co-owners individually.
Please report any errors to Barefoot as soon as possible.
Testing Tenant port data is essentially the same as testing Owner data. Log in > Contacts > Tenants >> Search. (Use a * wildcard in the tenant last name to bring up all records).
As you did for Owners, please verify that all data are correct. Click on the Goto box to review both Comments and Rental History (if these were ported)
This is the most complex element of the three to port, mainly due to the more complex nature of the properties themselves. Amenities, pictures, rates, descriptions all add complexity. Therefore, it is recommended that you spend a great deal of time verifying that all is good.
Click on Properties, select Property List and Search.
This should bring up a list of all the properties that were ported into Agent. Click on any property to open the Property Information page.
Because of the multiple and varying amenities each client has, it is imperative to verify that all the fields are captured correctly – AND that the appropriate data is accurate within each amenity box. Make sure the unit code, name, owner, address is all correct and then look at the custom amenities.
There are three basic types of amenity boxes – Y/N boxes, Drop-Down limited choice boxes, and text boxes. Please make sure your amenity fields are all correct and populated with the correct data.
(For instance, if you have an amenity box called Alarm Code – it should not be a Y/N box, it should be a text box)
Next to the Amenities tab in the middle of the page is a tab called Descriptions. Click this and verify that the property descriptions and directions (if appropriate) are captured correctly.
Note. “Descriptions” are INTERNAL descriptions. “Unit/Web” are what will be displayed on the iLink property page. Directions are self explanatory.
Once you have verified all the fields and contents are correct, it is time to test rates and pictures.
Click
on the “Goto” box and select “Pricing”. This will bring up the property rate
page. This is similar to a spreadsheet concept with rows and columns. Check
your date periods (rows) and your length f stay considerations (columns) and
make sure the correct pricing is captured in the relevant places.
As always, please contact your Barefoot rep if there are any errors.
The Catalog is the place to set up many system-wide items. This is where services get set up, Source of Business, Provisions, Amenities and Letters are done. Rates and rate periods that are created here apply to all properties, but, of course, you can override them on a property-by-property basis.
There are many things you can do in the catalog, but proceed with caution. Deleting stuff can often mess you up badly, so think before you click. Many of the important items in the catalog have their own section in this training guide. As always, ask questions if you are unsure.
Setting
up Custom Amenities
Agent allows you to create unlimited custom data and search fields for your owners, tenants and properties.
Each has two components. Data you wish to keep, display and use (but not search for) and data you DO want to search for.
Logic dictates that in order for you to search for a data field, the data field must exist first. (So it is pointless creating a search item called “Hot Tub” if no data field called Hot Tub exists.
To
create your custom fields, go to the Catalog
> Product data templates and data entry>Custom Fields and select which fields you wish to edit or
create.
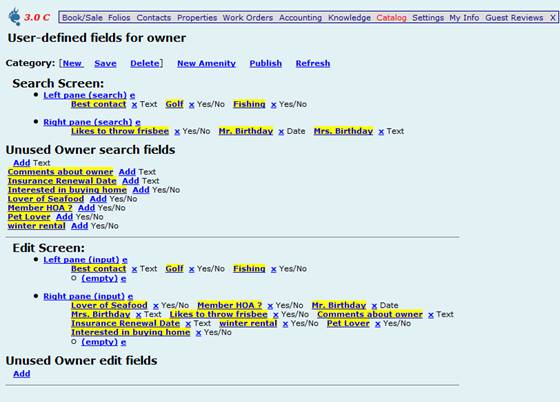
In the custom fields setup page there are 2
primary section. Search and Edit fields.
The concept is easy. Create your amenities
then indicate where you wish them to be.
Step one. Look for the unused amenities. We
include many default for you to use. Create those you need but are not in the
unused section by clicking the New Amenity button.
Now, be aware there are several types of
amenity boxes.
1. Simple Yes/No boxes. Easiest to use.
Easiest to find in your search. Use Y/N boxes when the answer is simple. Does
the unit have a microwave ? Y/N. Easy.
2. Limited Choice Boxes. Use these to
restrict your choices to a preset list of items. Commonly used for Bedding.
(King, Queen, Twin) for instance. When setting up a property, you can simply
click the drop down menu and choose which bed the unit has. This also makes the
amenity quite easy to search by.
You can have as many choices as you want and can rearrange the
order of the many choices by adjusting the Index of each as needed.
3. Text boxes. These allow anything to be
typed into the box. Good for codes or unique items. It is also the hardest type
to search for as typos etc. will render the search useless. (For instance, if
someone entered “Jacuzi” in a search, but the property has “Jacuzzi”, that unit
will be excluded from your search results as the spelling is wrong
Once you have created your amenities or
changed them from being Y/N to limited choice or text boxes, now you want to be
able to place them INTO your page.
For this example, I will use Owners to
demonstrate how to set up fields.
Remember, two primary categories.. Search and
Edit. Edit is stuff you want to keep and bring up on hand when the owner calls.
For instance, kids names. You are seldom going to need to search for kids names
but you might want this info on hand when you talk to the owner. So you would
create the field as a text box and insert it in to the EDIT section and NOT in
the Search section.
You can also have as many Headers
(Categories) as you want. Create them first and then insert the various fields
INTO those categories. Simply click the “New” button by the category.
Once you have created your categories and
amenities, click on the category WHERE you want the amenity to be. It will open
a white box confirming that this is where you are inserting the amenity. Then
simply click on the “Add” button next to the amenity and it will insert into
the category. Recommended that you do your EDIT section first and then decide
which of these items you wish to use as search criteria.
Once you have finished adding your amenities,
you may rearrange them in to whatever order you want them within the category
by adjusting the IDX number (index) of each amenity.
Once
you have added your amenities to your module, the last thing to do is to
PUBLISH them. All changes will be discarded if you leave this page without publishing
your work. This is a safeguard so that if you totally mess up the formatting,
you can discard and start again.
Hint. Make small changes and publish.. review your work. Repeat.. Much better
than making big changes and possibly messing up the format.
To
check your work, go to the relevant module. For instance. If you are creating
Owner fields like the example above, go to Contacts > Owners. The first page
is your “Search for Owner” – where your search criteria will be. In the example
above, the custom search items will include
“Best Contact”, “Golf”, “Fishing” and so on. So you can search for all owners
interested in golf or fishing for instance.
Once you go INTO an owner record, then you will have data fields there that are NOT search items, like “Lover of Seafood” etc. Whatever important data you want to capture about your owner.
The identical concept applies to Tenants and Properties. Properties is obviously FAR more complex due the many amenities that most people wish to list.
Go slowly.. Look at what is going on. Its complex but not complicated. Take your time. Publish frequently.
Batch Updating Amenities on Properties
You have the ability to update multiple amenities on multiple properties if you wish. Click on Catalog > Batch Update of Property Amenities. This will open a search for properties. Search for AND SELECT the properties you wish to apply the amenity setting to. The moment you have selected a property, the Amenity selection appears below. Select the Amenity(ies) you wish to update, apply the setting and save. Done.
Setting up Owners and Properties
You first add your owners to the database. Contacts > Owners > Add New.
Fill out the details and click UPDATE. Done.
Tip – When searching, Agent uses a “Wildcard” function – the * button. This allows you to enter partial info in the search field and it will use intelligent search to find what you are looking for.
For instance. Searching for S* in the owner last name field will find ALL owners whose last name begins with an S.
Searching for *@* in the EMAIL field will find all owners who HAVE an email address.
Searching for tenants with *d* will bring up all tenants that CONTAIN a d in that field.
Tip. When filling out the fields in an owner record, encourage your staff to complete them as fully as possible. Blank fields are never good. They lead to distrust in the system and your staff will never really fully use the data at their fingertips.
When an owner or tenant calls in, it is good practice to IMMEDIATELY do a quick search for that person – bring up the info to hand. It is terrific practice as you can then speak to the owner like a friend “Oh, are you planning on bringing <insert spouses name> with you. The owner is impressed as you ‘remembered’ his spouse’s name.
Once
you have entered your owners, go into an owner record.
It is NOT recommended that you add property charges to the owner account. Rather add them to the individual property itself.
The buttons of “Add Property” and “Add New Owner” are self-explanatory.
Security Update.
To prevent fraudulent and unauthorized use of owner Bank
Account Numbers, Social Security and Tax ID numbers, we have added a new
level of security.
In the section above, you learned how to add a new user
to Barefoot. There is a box there "Is Administrator", which if checked,
allows access to SSN/TID information. For obvious reasons, you should only
make trusted personnel to be Administrators.
If you are set up as an
Admin user, then the "All Contacts" field in the Contacts dropdown menu is
visible. If you wish to view an owner's SSN/TID, you need to look them up in
the All Contacts page, not the owner record itself. We have encrypted this
data in the regular Owner Record.
Now, a reservation (or other
non-admin) can still ADD this data when setting up a new owner, but the
moment they save the record, the data is encrypted and only visible in the
All Contacts owner record.
Setting
Up Properties
Should you have
unit/subunits, please get in touch with Support to discuss. Barefoot has the
ability to manage these for you, but they need to be set up correctly
Once your owners have been set up, you may add properties to your owners. It doesn’t matter to Agent whether you use the address, unit code or unit name as your identifying field. Agent will assign a unique 4 digit code to each property for internal use to make sure all transactions are assigned to the right property.
By
now you should have all your custom amenities set up. We highly recommend you
fill your fields in completely as gaps in data lead to distrust in data that IS
there.

Setting Pr
So the concept
is easy. In the Catalog > Provisions you can add and remove the Provisions
you want and then create the text you wish to insert into your Lease
Letters.
There are a few important considerations that affect the way you change an owner. When you change an owner in Agent, the change takes place immediately, so it is wise to make the owner change on the actual closing day, when the property is legally changed.
So, the day has arrived. You want to change ownership of a property right now. You have two options
-
Do you want existing future reservations for that property to stay with the old owner ?
-
Do you want to transfer existing future reservations and UNBATCHED existing reservations to the new owner ?
Check with you owner contracts to decide which way to go. The former owner might be within his rights to claim that revenue as his - as you got the reservation when he was the owner. Bookings MADE after today can go to the new owner.
You might also say that the old owner is history. Any reservation in your system belongs to the OWNER AT THE TIME THE GUEST ARRIVES. Which method is up to you. Different agencies view it in different ways. You decide which you want.
How to change the owner.
Pro Tip: We strongly recommend that you create a Property batch for the property you are about to change owners on. That will then capture any PAST reservations that have not yet been batched and paid out. (Remember if you select the second option above, it will transfer unbatched folios over to the new owner, something you probably do not want to have happen. Property invoices (non folio stuff) will not transfer over to the new owner).
Create the new owner in your Owner contacts.
Go to
the specific property you wish to change.(Property Information Page). Click
into the Go To box and click Change Owner.
A prompt will appear asking
you to select which of the two options mentioned above. Select the correct
one for you.
Another prompt will come up - a search box for the new owner. Search for that owner and select and save to the correct new owner.
Done.
Now, what has happened behind the scenes is that
Barefoot made a duplicate of that property. Remember, each property has a
unique "Unit ID" that Barefoot uses to link stuff together. So when you
changed the owner, the OLD owner might still have some accounting to deal
with. Maybe you owe him, maybe he owes you. Either way, his stuff still
needs to be alive in Barefoot so you can close things out.
SO, what we
did was create a clone of his property, made his 'old' property ID to be
INACTIVE and made the 'new' property active, so it shows up online and in
your search screens.
When you run your month-end accounting, any invoices or bills to that inactive property WILL still come up and will continue to come up until he has a zero balance. Then and only then are you really 'done' with the old owner.
Having excellent pictures on your website and in your property pages is becoming more and more important. With that in mind, we have made some important changes to the way pictures are uploaded into Barefoot.
You can upload as many pictures at a time, but we recommend that you upload your THUMBNAIL picture as a separate upload and then add your normal size pictures to each property. Check with your web company to see if you even NEED thumbnails. Many do not.
Each property has its own folder for pictures. You can either open the picture module up on the property page by clicking in the drop down menu on the property page, select Pictures and click the GoTo button. OR you can click on the flowerpot icon on a Property Search Result. That is usually the quicker and easier method.
Once in the picture module you can add, remove and edit your pictures. The IDX that you give each picture will determine the ORDER they are displayed, so the recommended IDX formula is 10, 20, 30 etc. instead of 1,2 3 - so that you can slot additional photos in later on.
Here are the step-by-step best practices for uploading pictures into Barefoot.
We have increased the maximum size of photos to be up to
20mb per picture. Our picture server will resize the pictures on the
viewer's screen depending on the device they are using - making it more
tablet and phone compatible.
** Avoid using the #
sign in any filename **
Follow these steps exactly.
-
Step 1 is to create your thumbnail picture in the property.
-
Click the Browse button (Called "Choose File in Chrome). Navigate to the folder where you have the picture you want as a thumbnail image and select the file name.
-
Click the THUMBNAIL button over the right. (You will see that the "Resize to Standard Size button gets automatically checked. That's OK.
-
Give it an index number of 10
-
Upload the picture. This will create TWO copies of the picture. One normal size and one thumbnail image with a IDX of 100
-
DELETE the first picture, the IDX 10 image.
-
Step 2 - Uploading the regular pictures
-
So now you have ONLY the thumbnail image in the property picture page. Great. Now you can start uploading your main pictures.
-
Make sure the "Resize to Standard Size" is UNCHECKED.
-
The system will automatically assign an index number (the way they are shown). You can rearrange this order once you have uploaded them to the property.
Photos with IDX 100 do NOT get pushed through to sites like VRBO/HomeAway.
Always leave the "Resize to Standard Size" button unchecked, IF you leave the Resize to Standard button checked, Barefoot will compress your pictures into the 10-30kb range which makes for a small picture that doesn't look terribly good when viewing larger pictures on your website.
Each property allows two primary description fields, an internal (for your
agents to see, basic, no-frills language) and an external (Unit/Web Comments)
box that will be displayed on your property page on the internet. This is where
you put ‘good’ descriptions of the unit to show off its finer attributes.
Update. We have been requested to allow TWO external descriptions (on your
booking engine). A short vers
You can now do that.
In the Property Information Page > Descriptions, you have a couple of boxes
below the important first three boxes (Description, which is internal,
Unit/Web, which is external and Directions, directions to the property.
Below that we have some other boxes that some agencies use for things like
virtual tours etc.
Write your short description in one of thes
It can add a nice level of professionalism to your search results.
For instance, there is little point including pet rules in a home that doesn’t
allow pets, or hot tub regulations in a non-hot tub home.
Click on Catalog > Provisions and set up your provisions. Delete ones you
don’t need and create new as appropriate. Whatever text you include there can
be automatically inserted in your letters for the specific properties.
See
more on the GOTO box in the “Property Management” module.
There are basically 3 settings you can choose from. Agent only, Agent and iLink and iLink only.
Agent,
for agencies that don’t do online bookings.
Agent and iLink – Both reservation agents and online bookings will have to
adhere to the min stay requirements.
iLink only – Office staff can override min stays but online bookings have to conform. (This is the most common choice).
Click on Catalog > Property Min Days Manage (Second section, 2E)
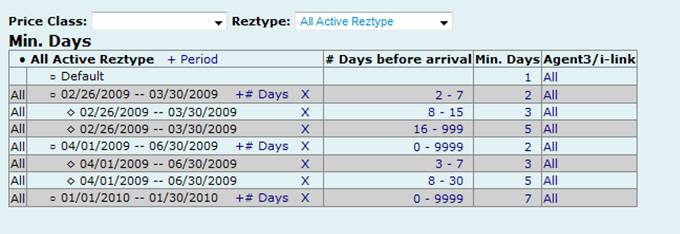
Click the +Period to create a period, set the number of days before arrival, the min stay and whether it is for Agent, iLink or Agent and iLink.
Then you can click the +# button on the date period you created and create a SUB-RULE for the date period. (See arrows above.)
This allows you to create a ‘window of opportunity’ to be able to override a min stay requirement if the booking is within X days of arrival.
In the example above, the period 2/26 -3/30 has some nice rules that you can advertise. If you book further out than 16 days, a 5 day min is required. If you book 8-15 days before arrival, then a 3 day stay applies. If you book 2-7 days before arrival, then a 2 day booking is acceptable.
This allows you to really maximize your opportunities and not lose potential $$ due to missing out on a shorter-than-usual stay, but only take said booking if it is last-minute.
If you do not allow shorter than your usual min stays, not matter when the booking occurs, even last minute, then only create one rule per period.
Remember, things you do in the catalog apply to all properties. You CAN create rules like this per price class and per unit as individuals as well.
The AVAILABILITY CHART has some great fun
If you do not put dates into the boxes, then the next 30
days comes up as a default.
You can also book directly from th
We have recently added some
cool new functionality on this page. There are some great statistics at the
bottom to help you see occupancy on a per-day basis. You can also see the
property minimum stay requirements in the yellow pop-up page.
The all-important Property Go To Box.
-
Account
This is where you can charge the property for stuff you have done for the owner. (Outside of a folio). You can review any charges/money that relates to the property. Watch your date ranges so you can find relevant data. -
Calendar
Simply allows you to view a 12 month calendar. -
Change Owner.
There is a whole chapter on changing owners. Please review -
Pictures.
There is a whole chapter on pictures. Please review. -
Pricing.
This is where you set your pricing on a property-by-property basis. Overrides Catalog or Price Class pricing. -
Provisions.
There is an entire chapter on setting provisions. Please review. -
Sub Unit and Room Block.
Ignore. Seldom used functionality. Those that have it will know what to do. -
Trust Account Scope List.
Ignore this. Seldom used functionality -
Email.
Shows an email history of emails sent to this property owner from the property page. -
Rental History
Pretty self-explanatory. Shows the rental history since the property was set up in Agent. -
Existing WO
Shows all current open Work Orders -
New WO
Allows you to create a new WO from the property page. -
Show Prospect
Ignore. Seldom used functionality -
Reminders, Create Reminders, Reminder History
There is a chapter on Reminders. Use them. They are great. For instance, create a reminder inside the property page to someone to go test smoke alarms twice a year. -
Folio List of Changed Property
This shows a history of if/when you moved someone out of this property into another property for whatever reason. -
Min Days Manage
Set your minimum days for THIS property only here. Seldom used. Most people use the Min Day Manage in the Catalog to set the minimum levels on ALL properties. -
Property Unavailability
This allows you to create a unit block for a property without needing to create a folio for it. Many people prefer to create a "Unit Block" or even just a "Owner Time" reservation on the property if the unit is going to be out of action for a while, but this offers you a slightly different way to do it. Use it for properties that are only in your rental program seasonally or if they are undergoing renovations etc. Works in much the same way as a Unit Block reservation but won't show up in any occupancy reports (Which can be a good thing as not to skew any numbers. If you used an Owner Time reservation to block a property, it could mess with your numbers.)
Property Amenities.
We
understand you may have amenities that are for internal use only (like Alarm
Codes, Lockbox codes etc.) – so YOU keep control over what you display on the
internet.
Couple ways. Same principles apply to both methods.
There are frequently two scenarios. Single invoices for individual properties
and bulk invoices for many properties (like a pack of utility invoices you got
from the power company that cover many properties).
a/ The SAME charge going to all properties. (Like a HOA $50 fee applied to everybody)
b/
Same vendor, same type of charge, but different amounts to each property (Like
a Cable TV bill that varies by property. Vendor is the same).
1. Default Folio Services. These are services that are on every folio. Each Reztype can have its own default services. These are not optional charges that you offer the guest but standard that are on every reservation (Like rent & taxes on a regular booking)
2. Optional Folio Services. Exactly that. Stuff you might want to offer your tenant, usually at extra cost, like Midweek Cleans or Bike Rentals.
3. Non-Folio Services. These are similar to optional services but are mostly related to properties – things like Utilities, Maintenance, Repairs etc. They behave the same way as optional charges.
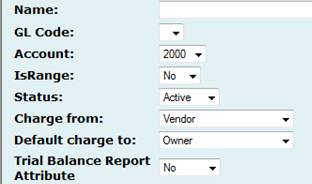
Barefoot
will set up your default folio services/charges per your business rules you
gave us. Those rules will dictate what services, when to collect the money,
when to pay it out etc.
2. The due in and due out rules
3.
Who provides the service. (Most commonly it will be a vendor but can be the
owner as well)
Once you have set up the basics of the service, now it is time to tell the system WHEN to collect the money and when to pay it out.
Click Pay In/Out rule.
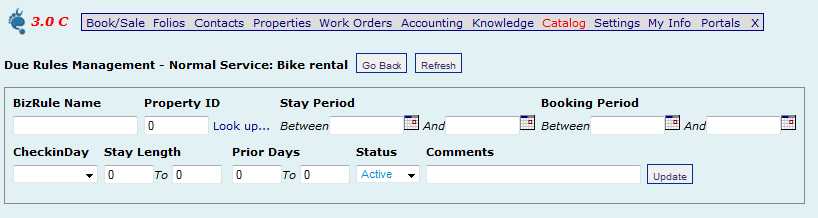
Give the rule a name. "Pay Rules" is a good one for now. Click Update.
That will bring you to a screen like this.
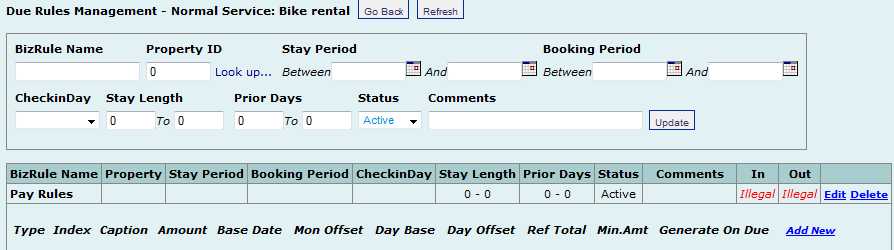
Now this looks scary. What the heck is "Illegal" and why am I showing it ? Well, its just techie-speak of saying you haven't got a valid pay in and pay out rule yet.
Click the Add New button. You need to create TWO rules. One to bring the money IN and one to pay the money OUT
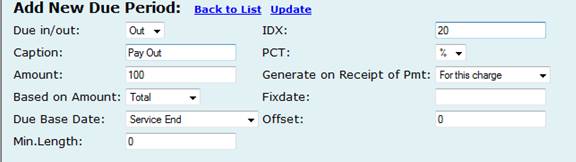
First you want to set your Pay-In Rule
Amount – set to 100
Amount based on Total is good
Set your due Base Date. This determines when you want the money to be due. If creating a folio service, it might be the contract date, or arrival date. If a property service, it could be due on Service Begin Date.
Ignore
the “Min Length”
Change the PCT to a % sign
Ignore the “Generate on receipt of payment” for Pay IN rules.
Leave the Fixdate
Adjust
the offset if required. The offset adjusts the Due Base Date - for instance, if
you wanted a service to be due 30 days before arrival, you would have the Due
Base Date set to Arrival and then put the Offset to -30. (30 days before
arrival).
Create the same again – but this time adjust it to OUT, IDX 20
Service
End date will be the most common pay out due base date.
Now. On the right hand side is a mysterious “Generate on receipt of payment”
box.
What this guides is simply this. Normally, for FOLIO type services, you are not going to pay the vendor if the tenant hasn’t paid the money in yet – right ? Of course.
However, PROPERTY type invoices will seldom get paid by the owners – mostly they will simply have you deduct the invoice from their rental income.
Sooo..
For Folio type services, you want to set this field to “For this charge” in the
box. For property type services, leave it alone as “No”
Once you have successfully created your pay in and pay out rule, your rule should look something like this.
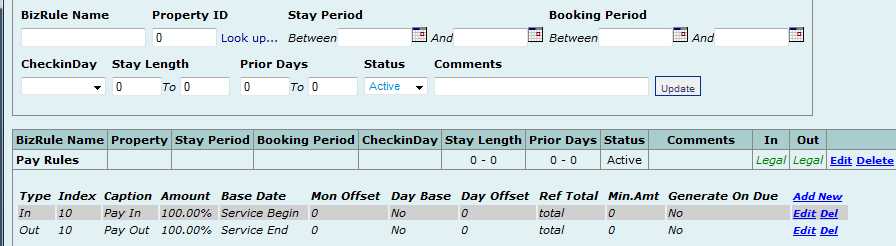
Note that it now says "Legal" on the rule. In this example the due date for
the money to come in is the "Service Begin" date and it pays the money out
when the service ends. Easy enough. You have other options like collecting
the money on Arrival date and pay the money out on Departure (very common
rule).
Almost done. One more step.
Now you have successfully created the service and set your pay in/out rule. Now you have to tell the system WHO provides the service. (Assuming you created a service where the Vendor is providing the service. Disregard this if the owner is providing the service).
Assuming a vendor is providing the service (Remember, YOU, the agency, are considered a vendor, usually called the “Operating Account”.
Go to Contacts > Vendors and look up the vendor that is going to provide this service. Lets pretend you have a service called Pest Control. You set it up per the instructions above. Now you know that both YOU (the agency) and a company called ABC Pest Control both provide this service. You handle it if the problem is small, but call in the pros when needed.
Great. Go to your vendor list – find ABC Pest Control. At the bottom of their record is a list of the services they provide. Use the down arrow, select Pest Control and add it. No need to fill in any of the other fields there.
What
you have done now is told Agent that this vendor provides Pest Control. Do the
same for the Operating account (or any other vendor that provides the same
service).
If only ONE vendor provides this particular service, make them the Default
Vendor.
Great. Now why the heck did I have to do all of that ??
Let
me show you.
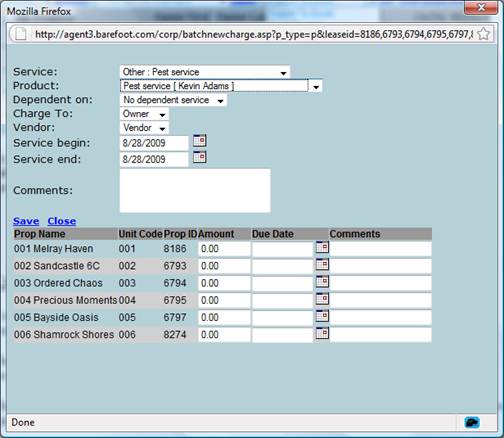
Now you go into a property – Say a unit had a problem with ants. You sent your
maintenance guy out there and he sprayed them. Done deal. Now you want to
invoice the owner for the service.
Go to the property account for that property, click New Charge, Select Pest
Control. You will now see you have a choice in vendors – both Operating Account
and ABC Pest Control came up in the list. Select the correct one, adjust your
dates and $$ amount. Add a comment as to what the guy did.. and save.
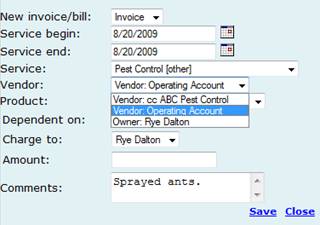
Sit back and smile – Done deal.
Note.Should this service have a fixed price, you can set that price in the Price Table, then the correct price will come up each time.
Assigning a vendor or owner to a particular property.
Sometimes an owner might require that THEY get the money for a service. They might want to receive the State or County Occupancy tax instead of you paying it to the vendor. Now you can do that.
Go to the Property Information Page and click on Contacts. This will bring up a list of the services you have created. On any of them you can click the Add button which will bring up the list of vendors that provide that service, and now, it will bring up the Owner as well. You can then make them the default service provider for that service.
Then, each time you add that service, the money will default to that vendor or the owner.
Barefoot will help you set up the basics of your rate table, but you will be responsible for it in the long term. It is not hard to grasp the concepts of the way it calculates prices.
There
are two primary considerations when determining the price of something in our
industry.
1. When the service occurs (peak vs, non peak rates for instance)
2. Length of stay considerations. Many agencies offer cheaper rates if you stay longer.
So the rate table will allow you to create Date Periods as well as length of stay considerations.
The way it calculates the rate is then governed by simple math. Pick the period, X times the correct columns = price. Sounds complex ? It isn’t.
Before we get into the nitty gritty details of the rate table, there are a couple of concepts you need to know about.
There are basically 3 ways rates are governed in our system. Catalog pricing, Rate Class Pricing and Property Pricing.
If you have a service that is the same for all your properties, then you can add it as a Catalog item – and it will apply to all your units. Create a date period in the Catalog and it will appear in all your homes.
If you have many units of the same type. Say all your 1 bed apartments are one price, 2 beds the same, 3 beds the same – then you can create Price Classes. When you set the 1 bed price in the rate class, it will apply ONLY to units in that price class.
However, many of you will have homes that are all uniquely priced. They may well have the same periods (all your homes go from High to Shoulder to Low to Shoulder to High on the same dates), but each home is priced differently (and it doesn’t matter which service we are talking about here) – then you would add your DATE PERIODS in the Catalog but adjust the actual prices on a home by home basis.
Property pricing will always trump catalog pricing and will ONLY apply to that specific home.
Example. You might charge $50 to clean all your homes. However, you have ONE home that you charge $80 to clean. Price is the same year round.
Go into the catalog, find the service called Cleaning and create a date period for this year (or until whenever you feel comfortable). Add $50 to the rate box.
This now sets the price of $50 as the default charge for cleaning the homes. Now go to the Property Page for you one property, go to the rate table and adjust the price to $80.
Side Note. Prices you manually override in a property will be highlighted in yellow. Good “heads up” for you to know that something manual has happened.
If you had two different prices for cleaning for most of your properties – say a Summer Clean and a Winter Clean, you could simply create two periods and adjust the price in each accordingly.
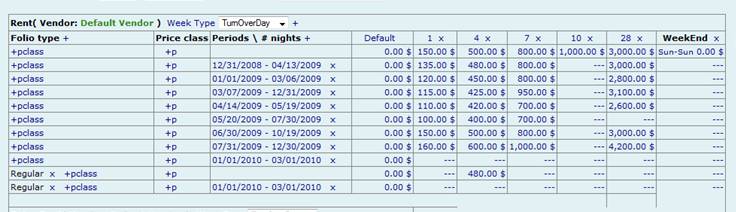
Lets look at RENT, as this is likely to be the most complex of your rates.
For instance. You might have a 1 day, 4 day and 7 day length of stay considerations. You might also offer a “Pay for 6, stay for 7” that is valid only between dates X and Y.
Look
at the screenshot below. There are several key elements here.
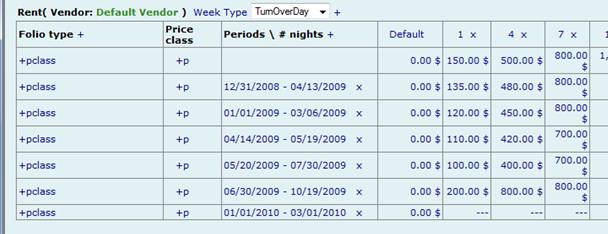
Look at the period 5/20/09 -7/30/09. If you stay for 1 night it costs $100. 4 nights = $400 and if you stay 7 nights, then $700 – NO price breaks. If you stayed 3 nights, it would just take the ONE night rate times 3. Easy.
Now look at the period 6/30/09 -10/19/09
Stay
one night = $200. Stay 4 nights = $800.. BUT, Stay a week at the 4 night rate.
Great special to offer on your website.
You could just as easily done 6 x the 1 night rate and had $1200 in the box and
advertised the “Pay for SIX, Stay for SEVEN” on your advertisements.
Simple formula. Look at rate period, take number of nights x the correct column to give a combination of pricing. For instance, if some stayed for 10 nights – it would take 1 x the 7 night rate plus 3 x the 1 night rate. Stay for 11 nights, it would take 1 x the 7 plus 1 x the 4 night rate.
If a stay crossed between periods, it would take the relevant number of nights from each period and keep them separate.
Alternative Method.
Some agencies prefer to use DAILY pricing instead of TOTAL pricing. You might like to say to a guest “Your total rent is $1000 plus X in fees and taxes”. You might prefer to say “Your nightly rate is $100 per night plus tax”.
We have the ability to set that up for you if you choose. Speak to your Barefoot Representative for help in this regard. You can still have date periods and length of stay considerations with this method, so you could have “Stay 1-7 nights = $100 per night. Stay 8 nights or longer = $90 per night”.
In most cases the structure of your desired rate table will be set up in the business rules configuration when we opened your account. However, you will still need to enter the rates correctly in order for our system to accurate calculate the prices to be shown in the folio.
Two concepts throughout our system.
1. Stuff you change in the Catalog applies to ALL properties
2. Stuff you change in the individual property only affects that property and overrides the Catalog.
So, if all your properties have the same price, setting it once in the Catalog will work for all properties.
Most
clients have individual pricing on individual homes – but the same RATE PERIODS
for all their properties.
For instance, if someone stayed for 6 nights, it would take 1 x the 4 day rate
plus 2 x the 1 day rate.
Create your date periods accordingly and enter the prices for that date period.
Cleaning Report and Housekeeping
There
are two primary reports for housekeeping and quite some flexibility in the way
cleans are handled.
Most agencies do a departure clean when a guest vacates. Easy. However, many
agencies offer mid-week cleans, daily cleans, spring cleans and many more. Some
cost the guest, some are included in the price. You should have identified your
cleaning types in your business rules and they should be set up in Agent by
now. This document is simply how to USE the cleaning reports, not set them up.
Two
approaches.
Note, however, it does NOT show midweek, daily or any other kind of cleans. This is NOT the report to use if your agency has those types of clean.
However, if all you are wanting is to do departure cleans, then this is perfect.
Larger agencies often have the different types of clean as well as the logic of cleaning every unit that appears on the report on the day of the clean. So each unit that vacates today gets cleaned today. Period.
Hover your mouse over Folios and select Managers Cleaning Report. You can select a day or a period and run your search.
This
will show up ALL types of clean on their specific dates.
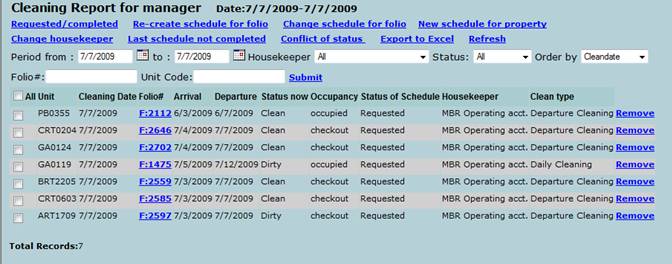
Then, on the departure date, when the unit is cleaned with the departure clean,
changing the status from Requested to Completed WILL CHANGE the unit from Dirty
to Clean.

T
-
From an in
-
You
-
Sa
-
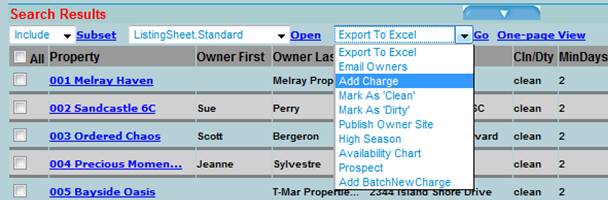
Same Charge, Different Price.
The concept is the same for both choices. Go to
Properties and do a Property Search. Use the search f
Use the SUB
1. Same Charge, Same Price. In the Action box (where it
says Export to Excel) select "Add Charge". Select your service, change your
start and end date and enter the price. If you have predetermined the price
in each property rate table, then click the "Cal Price" - this will bring up
the correct price from each property rate table.
2. Same Charge, Different Price. In the Action box, use
Creating TAXABLE property services.
Some states require that you collect tax whenever you
provide a service to an owner/property. We now have this ability whereby you
can create a list of taxable services and configure the tax service to apply
to each service when you invoice the property. What will happen is that
Agent will create TWO invoices to the property - one for the service itself
and one separate invoice for the tax. You would assign the vendor for the
tax just like you would any other service.
Please contact Steve or
any one of the Barefoot team members for assistance with this.
In the Property Go-To box is a new service "Property
Unavailable". This allows you to create a block where the property cannot be
booked, but no folio is created. Perfect for when the unit is out of
commission for maintenance or refurbishment. Just sele
Once you get into the iLink setup, please send Support a Word document with the text that you would like to send to the tenant automatically when they do an online booking. This may or may not be the same letter as you would send them via Agent. We will then embed it into iLink and it will get sent out every time someone books online. HINT. Mention to Support that you would like to be copied on this - so you have an email notification each time someone make an online reservation.
Now, some folks only want to send a very basic automatic confirmation and then follow it up with more detailed letters via Agent. That is fine. You can easily pull out a list of people that booked online, select your letter and send it out. (See the chapter on Folio Searches).
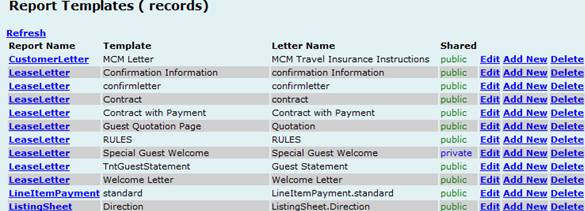
Creating template letters.
The
concept behind letters in Barefoot is to have personalized perfect letters that
you can then easily send out from many places. Each letter TYPE is important.
You have Lease letters, Tenant letters, Owner letters, Listing letters and
more. The logic is that if you want to send out a letter to your owners, you
don’t want to see all your tenant letters in the drop down choice. Likewise,
property type letter (Listing letters) are irrelevant to owners and tenants. So
each letter has a type. Then,
each letter is comprised of TEXT fields (that stay the same letter to letter)
and DATA fields (that CHANGE letter to letter). Combining text and data can
give you the perfect combination of a well written and personalized letter.
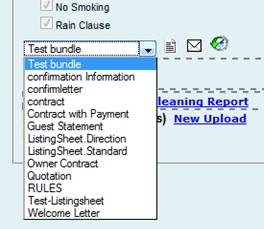
Creating Letter Bundles.
Letter bundles are useful when you send out more than one letter to a client
when you make a reservation
Same place as where you create your new letters -
Cl
That creates the bundle. Now you have to add the letters you want TO the
bundle. You will see your letters now appear below the newly created bu
Once
Sending
GROUPS of letters. (AKA Letter BUNDLES) This is a VERY powerful functionality.
You can do a search for data in your Folio Search page – get your results,
select a specific letter and send that letter out to all the folks in the
search results.
Simply select your letter from the drop down box (bottom left of the folio) and then either open it (to print or send out via your server) or click the envelop icon to email it out to the tenant from within our server.
Note,
you have to have your letters created first. Get them perfect and you never
have to touch them again.
The “Recycle” icon shows email history.
Note
about literature. These letters pull information out from many places to give
you a useful and personalized letter. Tenant info, property info, folio info
all comes together in whatever format you want. Spend time getting these
letters RIGHT. Trust me, it IS worth it.
When you click on a letter to send out to a tenant and click the envelope icon to email it out, a window pops up with your default email address, the subject line plus a text box where you can enter a personal comment to the receipient.
You can now also create a DEFAULT message that automatically populates into that little text box. It will be the same message for all users and all letters.
To set this default message up, you simply go to Settings > System Switches >> look for "defaultmessage" switch and click Edit to add your text. Save it and you are done.
For instance, you might combine a
Reservation Fee, Resort Fee and Damage Waiver into one item on your folio
confirmation letter and just call it "Administration Fee".
Add New Map. Title it whatever you want it to be
shown as in your letter. (Like "Administration Fee".) Decide if this letter
is going to be used in Agent or iLink. (If you want it on both, you must
create two bundles, one for Agent, one for iLink).
Most commonly, bundling charges like this is for tenants, not
owners etc. Select Tenant in the "Belongs To" column and save the
rule.
Then, click on the Map Number on the left and click Add. This
will bring up a list of your services. Add whatever services you want -
these are the services that will be combined into the "Administration Fee"
that I used in the example. Save your work and then test the results in a
lease letter.
How to generate searches and do reservations in
Barefoot
Searching for stuff in Barefoot is mostly quite easy.
The key is this - DEFINE YOUR QUESTION. Exactly WHAT are you looking for ?
There is an entire section below on Folio Searching so please refer to that
as well.
Searching for tenants, owners or properties is pretty
simple. You can use any of the seach criteria in the respective fields, like
"Last Name" or "Unit Code" in a property.
A key tool to use is the * function. We call that the
"Wildcard". The * tells Barefoot to ignore everything before or after it.
So, you might not know the spelling of a tenant's name, but you know it is
something like "Smith" (Could be Smythe, Smithers, Smit, who knows ?)
Go to the tenant search and in the last name field enter "sm*" (without
the " " of course) and search. It will find ALL names that begin with SM.
Tip. If you want to send out a mail blast to people - you obviously only want to do it to tenants/owners who HAVE an email address. Enter " *@* " in the email field. All emails contain the @ symbol, so the search will pick up everybody that has an email. Use additional filter fields like state or city etc. to further help you refine your search.
Searching for units is much the same. You might have 50 units in a development called "Silver Beach". All units might start with SB (SB501, SB202 etc.) Easy to pick them all up in one search by simply searching for SB* in the unit code field.
Moving reservations on Availability Chart
Did you know you can move a reservation on the Availability Chart? It is really very easy.
Open up your Availability Chart -
1. RIGHT click on a reservation on the Availability Chart on a reservation you want to move.
2. You will see a pop up box that shows two lines, Folio Details and Move Property. Click on Move Property.
3. On the left hand side of the chart, just to the right of the properties will show a new column, MoveProp.
4. Find the property you want to move to, and click on that property. You will have a pop up screen that asks you if you want to do this, and click OK.
5. The property will be moved. Click on the reservation which will take you to that specific reservation, and you will then be able to make any changes to the $$ that you would like.
All these changes will be documented in the internal comments on the folio.
Pretty easy............ Enjoy!!
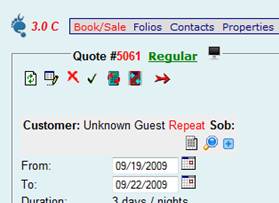
AKA Quote vs. Folio
In Barefoot, you always create a QUOTE first, and then, at the appropriate
time, CONVERT the quote into a folio.
(There is an exception to this. You CAN have a quote block off availability for
a period. Ask about the “Blocking quote/courtesy hold feature”.
There are two ways you can do this in Agent. The Book/Sale search engine and
the Availability Chart.
For instance, if you have 100 properties, you are unlikely to remember which
have hot tubs, which are pet friendly, which have high speed internet etc.
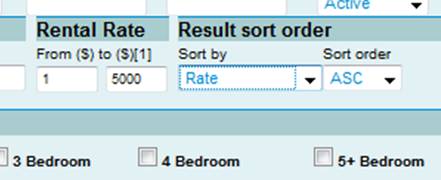
Tip. You can search for units within a certain price range – but you MUST
change the sort order to “Rate” for this to work.
Clicking the Book button generates the quote.
![]() Clicking this box will open up the search again and you
can change your
Clicking this box will open up the search again and you
can change your
Search
Criteria. It will retain your dates and other search selections.
Alternative Method – the Availability Chart.
If you put no dates in, it will show the next 30 days and ALL of your properties. You can narrow your search down by clicking on search criteria and entering dates.
In the grid, you will see color coded reservations and gaps where there are no bookings. You can book directly from here.
Click on an arrival date and the LAST NIGHT OF DEPARTURE… (NOT !!!! the departure date). A yellow box will pop up with rate information and you can book it right away.
Side
Note.
Pay attention to your reservation TYPES. (Reztype). Each reztype has its own
rules. Select the appropriate reztype for the kind of booking you are
attempting to do. Don’t, for instance, try book owner time with a regular
reztype.
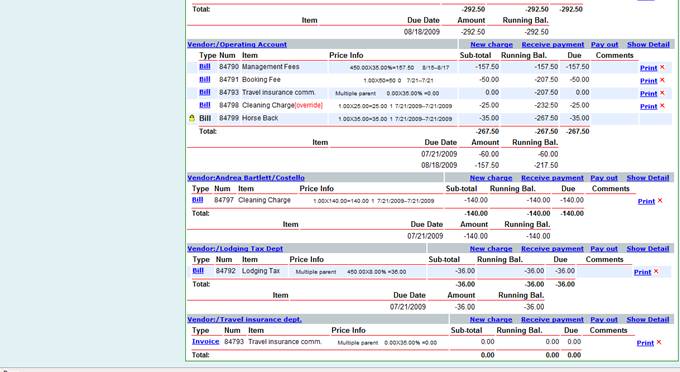
When reviewing your data, please pay specific attention to not only the charges to the tenant, but also the monies that get paid out to the owner and the various vendors.
Note. Agent generally sees you, the client agency, as a vendor. We also use Trust Accounting as the method of controlling and managing finances within Barefoot.
Trust Accounting 101.
Money
is received from the tenant via a series of Invoices. That money is held in the
trust account until the appropriate time for disbursal.
For
instance. Rent is charged to the tenant from the owner. ALL the rent money will
be allocated to the owner at this time. Then, there is usually an invoice from
you, the agency TO the owner for the management fee. That management fee is paid
out to the Vendor : Operating Account (you) at the appropriate time.
Pay attention in the folio as to who gets what and when. VERY important this is
done 100% accurately.
The Folio Itself – The Big Kahuna
(Use
your browsers "Zoom" function to enlarge if it appears too small on
your page)
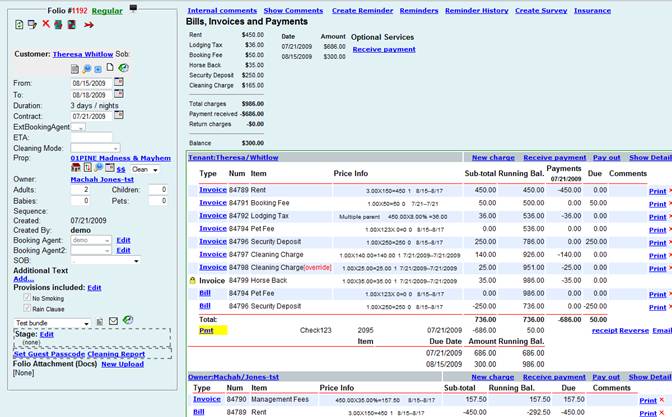
For every dollar coming IN to the trust account – there must be a matching
invoice paying that dollar OUT of the trust account. If they don’t match – you
have a problem. Simple as that. Contact us for help to take care of this.
How ?
Simply
click the check-mark box near the quote number to convert to folio. Easy as
that.
Simply
create new and click update or look up – click on the name and it will be
inserted here.
Folio stages are used by some agencies to keep track of what is going on with each folio. For instance, have you received the signed contract back from the tenant ? Did you send out the post-stay "Thank You and Survey" letter ? Etc.
Bottom left hand side of the folio is the Folio Stages. Click on the link and check the boxes that apply and save it. Easy.
You can change the master list of folio stages easily in the Catalog. First section, number 3." Configure Pre-defined Look Up Values. Add or remove stages there. You can also use the folio stages when doing a normal Folio Search.
So… Barefoot allows you to do both. Check the $ in the folio. Recalculate as
necessary.
Note
that there are TWO recalc buttons (see red arrows above).
If it is payment by credit card, it is a wee bit more complex. First question
would be is whether you process cards through Barefoot or do you have your own
card merchant and you receive money manually through their terminal (whether a
swipe card reader or an online service).
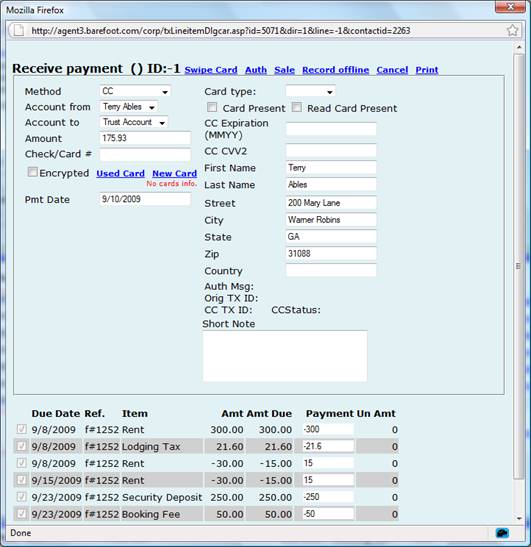
Once
you select CC payment method, the choices change slightly. Swipe Card – if you
have your own card reader and manual processor, NOT using Barefoot. Auth will
authorize a card for an amount and not charge it,
Use OTHER when entering payments into B
Use TRANSFER when you want to move mo
Then, there is an invoice TO the owner FROM the Operating Account (YOU) for the management fee. The corresponding bill paying the money out is in the Operating account section.
We consider you, the agency, a vendor. So, money IN from the tenant. Gets allocated to the various entities in the form of bills to be paid out at the right time. You might pay the money out on arrival or on departure – matters not. The key is that the dates get allocated how you want them.
Barefoot Accounting – The Basics
This chapter is really just to give you the basic understanding how Barefoot handles month-end accounting. Full accounting training is usually done after you have gone live and you have some real tangible data in the system.
Before we continue, please stop here and read the next section on Important Concepts – Due Dates.
Understanding that the whole success of your accounting data hinges on the FOLIO data is crucial. Simply put, if the folio is wrong, your accounting is going to be a disaster. Period.
Ok, back to Accounting. Now you understand the concepts of each section in the folio. Your system will be set up to pay money out to your owners and vendors per your business rules. Most people pay money out the month after the guest departs, but you can have any rule you want. Some pay out on arrival, others yet pay money out as money gets paid in. The key is to understand your rule and keep things consistent.
The way most folks do accounting/month-end in our system is via the Batch process. The concept is easy. Simply put, the system looks at all monies that have to be paid out since your last batch (Bills), lumps it into one statement, deducts monies owed (Invoices) and gives you a total to pay the owner or vendor or tells them to pay you if in arrears.
Generally speaking, most folks pay their owners and vendors once a month, but you CAN create batches and pay vendors and owners out as often as you want.
Mostly, you are going to create two batches – one for properties (owner statements) and one for vendors. Remember, we consider YOU, the Agency, to be a vendor.
So, how does this all get done ?
Ok, first things first. Assuming you are up and running and data is coming in, money is being collected and reported as payments in Agent, you are good to do a batch.
Your first batch is going to capture everything since the system was turned on for you. Be careful, there are likely to be test folios in there that you may have forgotten to cancel.
Once your first batch is done, then any subsequent batch looks at all the $$ between the last batch and the date of the current batch.
Most people pay out their owners and vendors around the 5-10th of each month for the previous month.
So, the way you do that is you create a batch dated the last day of the month. Say October 31. Doesn’t matter if you created the batch ON the 31st or on November 10th.. What the system will do is look at all money that has to be paid out UP TO October 31st. If there is a folio with a due date of a bill dated Nov 1, it will NOT be in the batch. Only stuff due Oct 31 and earlier will be included in that batch.
Batch Concepts.
There are THREE stages to a batch – Open. Recorded. Closed. NO step is irreversible. You can create a batch, record it, close it.. then UNrecord it and Open it again and even delete the batch. No harm done.
Open
Batch.
This allows you to take a snapshot of things and do a “sanity check” on the contents of the batch. You CAN EDIT folios in an open batch. The logic is to allow you to look for errors in the batch. Maybe you will see a Rent bill to an owner, but no management fee invoice. Maybe there is a charge to an owner that just looks wrong. You can click on the folio or the invoice and go look at the details and make changes to the folio to fix it.
Once all errors have been fixed, reset the batch and all changes will now be incorporated in the updated batch.
Now that your batch is PERFECT, you can RECORD the batch.
Recorded
Batch.
The recorded batch LOCKS the folios, DISallowing any changes to be made to them. It also now allows you to assign a check number to the payee and even print the checks inside of Barefoot. Paying the payees does not have to be all done in one go, but most people do so.
Once you have paid everybody, its time to CLOSE the batch.
Closed
Batch.
The closed batch takes monies that are OWED to you – and carries them to the next month. Maybe an owner had a property maintenance invoice but no rentals to cover the cost. He is (in most cases) not going to write you a check for say $25. He will want that money just to be deducted from the next months rental income. Closing the batch will carry that money to the next batch.
So, HOW precisely do I create this mythical batch of which I hear ?
Easy.
Hover your mouse over Accounting, scroll to and click on Batch Management. That will take you to a search page where all your old batches will be viewable. Click Add New.
Remember, you are going to do TWO batches at least – one property, one vendor. Decide which you wish to do now. Lets do a Property Batch.
There
is a box to input a date. Enter the last day of the previous month.
Side Note. You can easily create batches for individual properties or vendors.
Most folks pay ALL their owner and vendors together, but there is nothing
dictating you to do so. Often a housekeeping vendor will want to be paid weekly
when other vendors get paid monthly. No biggie. Just create a batch for them.
Ok, so you have entered the batch date, click next. This will create the batch and give you the list of payees. Play around with the reports at the top – there is some GREAT stuff there. Batch Summary being an outstanding one to look at.
What I like to suggest is to click Statement – even though you haven’t written any checks or done any fixing yet. This will give you a good view of the ‘initial’ state of affairs.
In the statement there are two sections. A year-to-date and current period. Obviously for your first statement they will have the same numbers (duh).
Look through EACH AND EVERY line item. Look for stuff that is just WRONG. Common sense applies here. For instance, if your rule is to pay out money after departure and you see a folio there with a future arrival date, something is wrong.
If
you see a bill paying out rent to an owner, but no management fee – CHECK IT.
WHY is there no management fee ? Open the folio and go take a look. SANITIZE
this list. Make changes to each folio if you find errors.
The batch MUST BE PERFECT before you continue to the next step.
Assuming you have now fixed any errors you have found, CLOSE the statement. This will return you to the Statement Account List. Click the Reset All button to accept all the changes you made to any folios and it will update things for you.
Now you are ready to whip out the checks and pay your owners or vendors. Great.
Time now to RECORD the batch.
Once you record the batch, the look will change slightly. You will now see an Assign Check button. Its pretty easy. You can assign checks to all or to individuals. Up to you.
Side note. If you select All and assign a check and you see owners there that DO NOT have a check number against their name, fret not – it just means they OWE YOU money. Look at their statement and you will see it.
Next batch, the system will remember the last check number you used.
Print your checks. Print your statement. (You can also EMAIL the statement to your owners. Please just make sure that each owner does indeed have a valid email address. Trying to email a statement to an owner with no email address throws our system into a hissy fit.)
Great job. You have now paid your owner (or vendors). Time now to close the batch. Easy.
This carries the money owed by any owner to the next batch.
There
are other functions in accounting. Fool around in the accounting section. You
are not going to break anything by looking.
You can also create batches and then delete them. No problem. My only
recommendation is that you DO NOT leave batches open and create new ones.
Create your batch, sanitize it, record it, pay out, close it. Done. THEN you can open newer batches. Its just cleaner and better that way.
Seriously guys, the key is to understand the folio. IF you have your folio dates and amounts correct, your accounting should be a walk in the park. If you cut corners and don’t test your folio rules properly, chaos will reign. I have seen it, and believe me, it ain’t pretty. We get blamed all the time for stuff like this, but it is NOT our fault. The responsibility to test the rules is yours and yours alone. Of course we will assist and show you what to look for, but please test and test and then test some more. It really IS worth the effort in the long run.
How to create batches for specific groups of vendors or owners.
Emailing a statement (Property, Vendor or Tenant) is easily done
from the Batch. You are actually
emailing a letter to the Owner (Vendor or Tenant) with a link to their
statement.
To email an individual statement to
the Owner, follow these steps:
1.
Locate the
correct batch.
a.
Go to
Accounting>Batch Management
b.
From the search
page:
i.
Select the Statement Type:
Property
ii.
Enter the Statement Date in both
fields (i.e. 07/31/12)
iii.
Click on the “Lookup” hyperlink to
select the individual owner (using Last Name, Unit Code, etc.) and click
“Go”
iv.
Click on the correct property in the
“Account Look Up List” box. This
will populate the Account ID field.
v.
Click Search
2.
Click on the
“List” hyperlink for the correct batch.
This will open the Statement Account List for that batch.
3.
In the Statement
Account List, click on the ID check box for the correct property statement.
4.
Check the
dropdown box to make sure the “Owner Statement Letter” is selected.
5.
Click “Email”
6.
A script window
will open. You can change the
“reply to” email if necessary.
When correct, click “OK”.
You can choose
individual properties to send this email to, or you can click on the check
box for “Select All” to send to all properties in the batch that have an
email entered in the Owner Info page.
If there is one thing that causes problems with our clients, it is that the due dates are not accurate.
TEST… TEST… TEST AGAIN.
Generally speaking, PAYOUT dates of bills do NOT get created until the money has been received from the tenant – so, although you will see the bill assigning the money to be paid to the owner or vendor, it should not have a due date OUT until that money has been paid by the tenant. Very important concept that you need to fully grasp before signing off that the rules are correct.
Therefore, in a QUOTE – there should NOT be payout dates assigned at all. ONLY due dates IN from the tenant.
Once converted to a folio – and money is received, only then does the system allocate a payout date per the rule for that service.
I cannot stress how important it is for you to test these rules. For instance, if a payout date is not set, then the money will simply sit in the trust account forever and not get paid out. If a payout date is assigned before the money comes in from the tenant, then you might end up paying an owner or vendor EVEN IF the tenant never pays their invoices. Not a good thing.
Of course you can easily add charges to a tenant manually too. There are generally two types of charges – default charges (that occur each time on every folio of this reztype) and optional charges that you can add to any of the entities involved in this folio. Simply click the “Add Charge” button, select the service (which will have been set up ahead of time), make sure the dates and amounts are correct and save it.
For folio testing we recommend a series of test folios to try emulate the real world. Many agencies have different rules as to when money is due in from the tenant. Commonly a deposit is taken at time of booking (Contract Date) and the balance due 30-60 days before arrival. If a booking is made within that 30-60 day window, then full payment is typically due at contract. Your rules may be different.
Create a few folios – short stays (3-5 days) arriving way out in the future (outside your 30-60 day window or whatever window you have). Create short stays folios arriving soon (within the window). Check to see that the amounts charged are correct along with the due dates.
Create folios of a longer stay. Maybe you have a “Pay for 6, stay for 7” type of promo. Test it. Create some arriving soon, some arriving way out there. Test… Test.. Test…
Report
ANY errors in the rules to your Barefoot representative ASAP for correction.
Many states make it illegal to pay a vendor if there is no money in the
specific property account to cover the vendor invoice. Barefoot has the
ability to prevent you from paying out a vendor unless there is money in
that account. The following is a specific step-by-step set of instructions.
PLEASE CONTACT BAREFOOT if you wish for this option to be turned on. It is
NOT a default setting.
The concept is this. Vendors and Properties should (must) always be paid out via the batch process. Before you pay a vendor, you must ensure that there is sufficient money in the property account before you actually pay the vendor.
In the Barefoot system, when a property batch
is completed, all the money due to the owners is paid, leaving a $0 balance
in their account. During the month, when money is paid into the
system, that money must be recorded in the property batch before paying any
vendor batches. (Note: NO vendors will be paid until there is
enough money to pay the ENTIRE amount due to vendors in this particular
batch. Once there is sufficient amount to get the particular batch to
zero, all vendors due money in the batch will be paid).
If your business rules are such (or State Law dictates) that vendors are NOT to be paid if there is insufficient money in the property account, here are the steps that MUST be followed in your batch process.
There are basically two scenarios.
1. You pay your owners and vendors once a month
2. You pay vendors and/or owners multiple times during the month.
If you pay your owners and vendors only once a month, it is very easy - simply create, sanitize, record, pay and close your property batch FIRST. THEN do the vendor batch. (Create, sanitize, record, pay and close) (The property batch will deduct money to pay the vendor from the owner income and assign that money to the vendor that needs to be paid). Easy.
If you pay vendors during the month, then you have to create a property batch first and record it (do not close it nor pay out money to owners yet).
Then create your vendor batch, sanitize, record, pay and close the vendor batch.
There is no need to touch the property batch again at this point in time.
If you need to pay your vendors again (maybe the next week) you have to go to the recorded Property batch, UNRECORD it, RESET ALL ACCOUNTS and then RE RECORD the batch. Then create your new vendor batch, sanitize, record, pay and close.
Any time you plan on paying an owner, open the batch, reset all accounts, sanitize, record, pay and close.
The added side effect of this process is that you should never get into a situation where an owner is in arrears and owes money TO the trust account - as the vendor would not have been paid if there was no money in the property account in the first place.
Blue Recalculate : Rent Recalc. In many instances, a tenant is looking to negotiate a deal on the rent. This Blue Recalc button is the easiest method of adjusting the rent. When you click on it, you will be able to enter a new rent amount (as opposed to giving a discount as a separate line item). When you change the rent here, the taxes, management commission and other services like Travel Insurance will automatically adjust.
Green Recalculate : Standard Recalc. Sometimes you might want to change a key element of a folio - the number of people or pets etc. Some clients charge extra money for extra people of the number of pets. You might change this number and NOT want to charge extra - you might WANT to charge extra - we do not know the circumstances of why you are changing that number. For instance, if you have a "Extra Person Fee" and you change the number of people in the party - we will NOT add the extra person fee automatically if you just change the number. Do a Green Recalc to apply the fee
Another example. Pet fee is a good example. If you unlock the folio, change the pet fee to 1 or 2 – a pet fee might apply per your rules. You may waive these charges – we don’t know. SO, do a standard recalc (green button with red arrows) and it will recalculated the charges and apply them to the folio. Easy. Here is a silly example but it demonstrates the point. Say a tenant calls you and advises that he brought a goldfish in a bowl with his family - he is technically bringing a pet, so you may want to change the pet number from 0 to 1 - but you sure would not be charging the pet fee (or would you ??). You get the idea. Changing people and pets etc. in the folio will not automatically change the pricing unless you do the green recalc.
Another example. This one quite a common scenario. Say you want to MOVE a tenant to a different unit. You can use the Shuffle Unit function to put them into another unit - which may or may not cost more or less. We do not know WHY you are moving them. They might want a better home and are prepared to pay extra or you may have had a problem with the unit they were in and you are not wanting to charge them extra money as it is not their fault. So the $$ will stay the same if you move them UNLESS you do a green recalc.
Side note : normally, if you change the arrival or departure date the
system WILL adjust rent etc.
Red Recalculate : This is your "reset" button, a thorough recalc. Basically, if you click the red recalc it will reset the folio AS IF you had just made the folio. It will remove any discounts, services or any adjustments you had previously - resetting it back to normal.
A key rule within Barefoot is that we will NOT change your existing folios
if you change a master (Catalog) price or a business rule. Only if you do a
red recalc will it update to your current pricing/rule.
Example. Say you decide to increase your
reservation fee from $25 to $35. Fine to do that moving forward, but you can’t
add that $10 to existing folios without incurring some irate comments from
tenants.
If
you do a THOROUGH recalc though, (red button with green arrows) it will RESET
the folio to your CURRENT rules. It will remove any add-on charges and get
everything the way it would be if you just created the folio.
What a great concept – selling tenants additional ‘stuff’. We highly recommend you offer services beyond just renting the unit. Not only can this be enormously profitable to you – it also gives the guest a service they can trust (after all, you recommended it). Talk to your local merchants and consider adding services to your tenants. Attraction tickets, fishing charters, bike rentals are great money-makers for many of our clients. Another HUGE source of revenue are internal services like “Daily Clean”, “Early Check-In”, “Late Check-Out”. Seldom do these cost much to manage and can produce great goodwill and some good $$ in your pocket.
Simply click the Add Charge against the tenant line, select your service and dates. Throw in a comment and update. Done.
Now, of course, you have to have the service set up correctly (See the section on adding services).
Barefoot has the ability to provide your reservation agents with a pop-up window when they try convert the quote to a folio – reminding them to offer additional services that you sell. Inquire with your rep.
Sending out literature from within a folio
Congratulations, now you have created your folio. Awesome. Now you want to send out some paperwork to confirm and inform the tenant. Fortunately for you, Barefoot makes it easy.
Simple
red X at the top. Clicking it will cancel the folio. Easy. We suggest you
refund the money first of course.
Now, wait a sec. What about money and cancelation charges/deposits etc. ? Great
question there, my liege.
Remember, if you don’t have bills and invoices matching – you have a problem. So, if you want to hold back some money, you need to create an invoice to ALLOCATE that money to someone (probably you) otherwise that money will sit in the trust account forever and not get paid out.
So, create a charge called “Cancelation Fee” or whatever. Make the amount the $ you wish to keep, refund the rest – THEN cancel the folio to release the property back into the pool.
We can also set a rule up for you to automatically keep some money and allocate it in a specific way, while releasing the property back into your availability pool. Talk to your rep about your cancel rule.
There are a couple ways you can do this. If you are refunding 100% of the money, you can simply reverse the payment they made, effectively canceling the payment.
In
this example, the tenant made the first payment. (see highlighted yellow below)
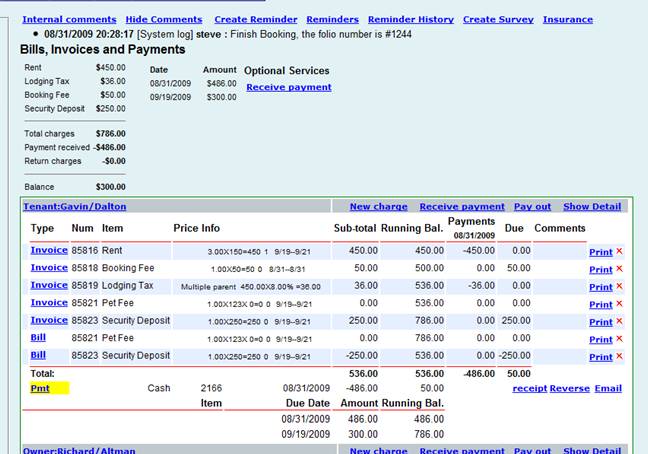
NOTE.
If you wish to remove single invoices, just clicking the red X on the right
will cancel them. Easy.
Note. Clicking the “Show Detail” button on top right will expand the accounting section to show the specific dates of each invoice. This is VERY important when testing your business rules for each reservation type.
RULES TESTING
In your Business Rules Matrix that you supplied us, you laid out how you do business with regard to what dollars you collect, when you collect it, who it goes to and when it gets paid out.
IT IS UP TO YOU TO VERIFY THAT ALL IS CORRECT.
Check each reztype extensively. Each reztype will have different rules of course.
Check
that the default services are correct.
Check that the due dates to the tenant are correct.
Check
that NO dates have been assigned on the payout money until money has been
received.
Recommended Format.
Create a quote, make sure NO payout dates are there.
Add tenant (Test)
Convert
to Folio.
Receive full payment (as OTHER)
At that point, our system should assign payout dates on all the money in the folio.
Check that each service/owner/vendor is correct. Dates.. CHECK .. CHECK.
Look
at each service. Is anything missing, wrong price, wrong date ? ?
Each invoice should have a corresponding BILL paying that money out to the
vendor or owner.
Is the vendor correct ? Dates correct ?
Once verified that all is 100% accurate, reverse the payment and cancel the folio.
Folio Searching in Agent appears complex and difficult – it is not. The key to finding the data you seek is to define your question. WHAT am I looking for.
Once you have clearly defined the question, then which fields to use becomes a logical choice.
For instance, if you are wanting ARRIVAL information, then the Departure or Contract dates are irrelevant. If you want a DEPARTURE report, then Arrival dates are irrelevant.
Of course you can use multiple search criteria to further narrow your search down.
For
example, you can get a report of all QUOTES that “Mary” did between Aug 1st
and Aug 5th
(Change to Quote search, use contract dates and Leasing Agent fields)
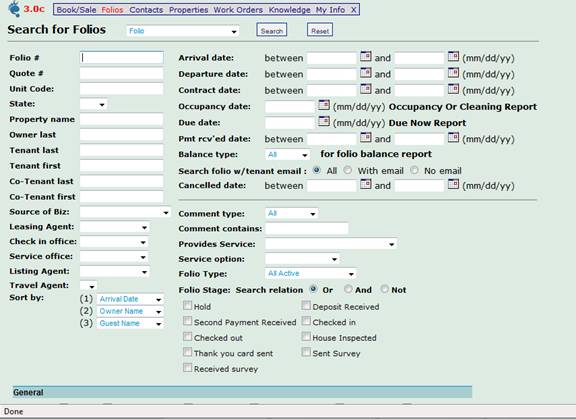
On the left column you have obvious fields to find a folio quickly by name, or number or other similar criteria. The middle column is more to find GROUPS of folios. Again, define your question.
For
instance, if you wish to see all people arriving next week, you would use the
ARRIVAL dates as your search criteria. Departure dates or Contract dates (when
the folio was created) are irrelevant to you, as you are looking for people
arriving. Use the DEPARTURE dates if you want to see who is leaving between
dates X and Y. Easy.
Below that you have different options to help you further. You can see a
specific REZTYPE, like “Web Bookings”… and further refine your search. Use the
Folio TYPE box.
For instance, you wish to see how many internet bookings came over the weekend. Use CONTRACT date to enter your dates, select “Web Bookings’ and search.
Different types of reports are available in Agent as standard. Use the drop down menu to select the appropriate report for the data you seek.
For instance, there is a report called “Departure List”. Obviously you would use departure dates as your search criteria.
However, doing a FOLIO search and a DEPARTURE LIST for the same dates should bring up the same folios, right ? Correct. However, they contain different data. Folio search will give you financial data, the Departure List will give you more housekeeping and departure-comment type data.
The
key is to get comfortable with the layout so that you can quickly get the data
you seek. Different clients use different reports. We created many of these
reports to help you find data, trends, financial information and much more –
tools to help you manage your business.
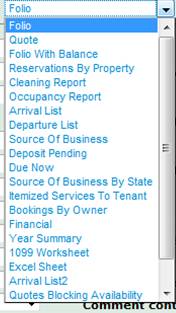
Each
report contains different data. You will quickly learn which is most useful to
you.
Once IN your search results, you can export most reports into an Excel format for further manipulation and analysis. You can also send out literature directly from your search results.
For instance – you go into the Catalog Letter Editor and create a Welcome Letter. This will contain all relevant data for a tenant to know that you expect him, how to get there, what to do upon check-in etc.
Use the Arrival Dates for your search criteria and search for your folios.
Use
the drop-down menu to select your Welcome Letter and click Email Tenant.
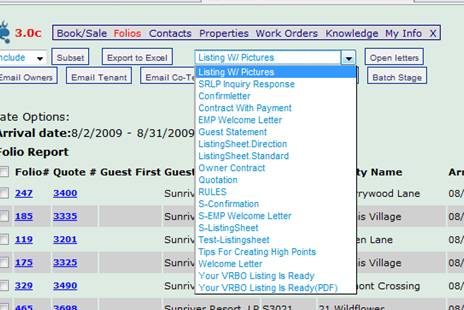
Agent
will then format the letter with the appropriate data from the folio, tenant
record and property, in the layout you created in the letter and email this
letter out to everybody in the search results. Prior to sending out this email
you can also SUBSET your results, taking our or leaving in selected records.
(For instance, it is not generally necessary to send an owner a welcome letter,
he knows the drill. So, remove the owners coming in from the search results,
select Welcome Letter and send it out.
Of course you can open and print these individual letters as well. The Barefoot philosophy is to try make your office as paperless as possible, so electronic tools are better than paper documents.
Please take time to get familiar with the Folio Search page. Your confidence and speed in navigating through Agent will be VASTLY improved once you are familiar with this page.
Barefoot Reports 101
Barefoot has many standard reports for you to retrieve valuable information.
The KEY element of success with our reporting is to DEFINE YOUR QUESTION !!
Ask yourself “ WHAT AM I LOOKING FOR”. Once you define that, the system search becomes quite logical.
The Folio Search Page looks intimidating at first. Relax, its actually quite logical. The different reports also contain different data, so get familiar with each report and what it does.
For instance, a standard folio report is all to do with $$.
An Arrival or Departure report is more to do with who’s coming/leaving, next arrival, comments etc.
Logic
would dictate that if you use the same search criteria for Folio Report and an
Arrival Report (say using the Arrival Date as a criteria) – you will get the SAME
FOLIOS in the report – but the two reports contain different data.

As to the comment of “Define your Question”, think about it. Look at the screenshot above. Each field gives you a search criteria.
For instance. “I want to see all arrivals coming in between today and Sunday” – Use the Arrival Date boxes to get your data – you don’t care about their departure or even when the reservation was made (Contract Date). Then, part two of the question is what data you want. Do you want to know who owes you money – use the Folio Report. If you want to see Arrival Comments and stuff like that, then select the Arrival Report from the drop down menu.
Tips. If you sell additional services, like “Early Check In”, use the box marked “Provides Service”, select your service and additional criteria (like people arriving next week)
You
can also select by reztype. Remember, once you have searched and you have your
search results up, you can send literature out to multiple tenants.
So, classic GREAT example. Do an Arrival List for everybody coming in next week
(whenever), select your “Welcome Letter” and send it out to them. We will then
send out your personalized and customized letter to everybody in that search
result.
You may not want to send them out to the owners (like they NEED a welcome
letter J
) Use Regular bookings (or whatever) as the reztype and only folios of that
reztype will come up.
Important reports.
Folio Report.
To find groups of folios with financial information use this report. Use
your search parameters to find what you are looking for.
Quote Search - If you have
created a quote, you won't find it by searching for Folios - as it is not a
folio yet. Use the quote report.
Arrival List
- see who is coming in (and who is checking out on those
days).
Departure List
- many agencies use this as their primary housekeeping report with the
simple logic of "On the departure day, clean the house". This report will
also show you your back-to-backs that are coming in that day. (Displayed in
red).
BRAND NEW. Back to Back Report. Do you want to know just HOW MANY back-to-backs you have on a given day ? Run this report.
Folio
with Balance Report. (FWB)
The
FWB report is a very valuable report to see who owes you money. When you use
the FWB report, remember to select your option with regard to the balance
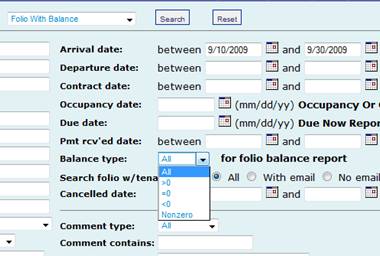
You
may choose to see ALL folios coming in or leaving (use departure date criteria
in that case), You may also use >0 for balances greater than zero (will
ignore those folios that are fully paid), =0, equal to zero etc. Mostly you are
interested in those that owe you money, so use the >0 choice.
Enhanced
Occupancy Report.
Hover your mouse over Folios in the Nav bar, and one choice is the Enhanced Occupancy Report (EOR)
This report is designed to help you find trends in your market. You can search for a date range, specific units or even units with specific amenities. The report will show you dollars, length of stays and much more.
For instance, you wish to see your average length of stay for July versus August. Just run the two reports and look at the great data you get.
Or compare Pet Friendly homes against the others. How do your hot-tub homes perform against the rest?
Superb data to help you see whats going on in your ever increasingly competitive market. These reports can help you stay on top of the game.
Managers
Cleaning Report. (MCR)
Note. See the entire chapter above on the Cleaning Report. It has a lot of detail.
Hover over the Folios and click the MCR. Click submit and it will bring up a report of all the cleans, the types of cleans and who needs to provide said cleans.
Note about the Clean/Dirty status and how this ties in to help you and your front desk staff and cleaners.
Most agencies have the unit cleaned on departure. Standard rule. So, on the departure day, the unit will appear in the MCR.
When the guest first arrived, the unit was clean and set to Clean status. At midnight the following morning, our system would convert that unit to DIRTY status.
The guest is now departing today. The unit is Dirty and on the MCR. Cleaner goes out and cleans the unit. Some folks will inspect it, others wont, no matter. WHEN IT IS COMPLETE, select the unit in the MCR and convert it from Scheduled to Complete. That will change the Clean/Dirty status back to Clean.
Now, this Clean/Dirty status is visible in the Folio itself. Why is this important ??
Well, for front desk staff, they don’t know WHEN the unit will actually be cleaned. So, Mr. Jones arrives early and wants to know if his unit is ready. First thing the front desk person should do is pull up their folio. Right there is the status – if Dirty, then the unit is obviously not ready. If Clean, then the agent knows the unit is ready and the guest can check in.
The Clean/Dirty status is also a clickable field in the folio. For instance, say the unit has been empty for some time. Front desk feels that a touch up dusting is needed. They can manually change it to Dirty and let housekeeping know to give it a once-over. When done, they change it back to Clean. Easy.
Note. If you sell services like a Midweek Clean, the unit will appear on the MCR on the appropriate date with the “Scheduled/Completed” requirement – but it will NOT affect the Clean/Dirty status. You sure don’t want it to be converted to clean as then on the check out date it will appear that the unit is actually clean when it really is not.
No Due Date Report
When you create an invoice to someone, there is an automatically generated BILL paying that money out TO someone. Trust Accounting 101. However, the DATE to pay the person out is only generated WHEN the tenant (or whoever) pays the invoice. For the most part, you are not going to pay someone out unless you have received that money in.
Now, it happens from time to time that the Pay Out Date gets removed, either by someone manually deleting it accidentally, or some system issue or rule that caused no date to be applied when you received the payment from the person. The net effect is that the money will sit in the trust account, never getting paid out.
We have a report in Accounting > Reports, called the No Due Date report. We recommend you run this report monthly as part of your standard accounting procedures. If using the field of "Balance Type - Balance is ZERO" you will pick up any folios or invoices that have been paid, but have no payout date to the payee. The good news is that they are easy to fix and happen very seldom. It IS important that you run this report regularly to catch anything that might have slipped through.
Source of Business Report - AND Coupon Usage Report
Concept. In Agent you can typically have TWO source of business codes - one in the tenant record, one in the folio itself. They are often the same but not necessarily so. You might have booked someone due to a "word of mouth" referral initially, but subsequent bookings from the same tenant might have come from marketing/email offers you sent them after they rented for the first time. So the TENANT SOB code might be "Referral" in this case, but a folio could have "Fall 2010 Special" - a special offer you sent to the tenant.
Go to the Catalog and set your Source of Business Codes. You can easily manage them there. Make old unused ones inactive and add and delete as necessary.
Then once you get your staff to enter them when creating tenant records you will want to keep track of them.
That is where the Source of Business Reports come into play. They cover both eventualities and more.
Hover your mouse of Folio and click on the SOB report in the drop-down menu. This will now allow you to retrieve your results from your folios that are in Agent.
There are several types of report you can run.
1. SOB By Business Code of Folio - to pick up folio SOB. Many other restrictors are there, like Arrival between X and Y
2. SOB By Business Code of Tenant - to pick up the original SOB when you created the tenant record.
3. SOB by State and Zip Code are two more reports. Quite self-explanatory.
4. SOB By Coupon of Folio. This allows you to track usage of your coupon codes.
You can also select individual reztypes to run this report for. More great tools to help you measure the effectiveness of your advertising campaigns and how you get your business.
All of these reports can be exported into Excel for further manipulation.
You can easily edit, add and remove your Source of Business codes in the Catalog. First section, number 3.
Deposit Pending Report
Several of our clients have short-term reservations with multiple due dates. This is especially common in the MA area where it is common to have a folio with up to 4 payments spread out over time.
The trick has been to see WHEN those payments are due. Easy enough to see who still owes you money with a Folio with Balance report, but that doesn't split the various payment due dates and the amounts owed, making that report less effective
However, we have a GREAT report you can run to see all of those folios with multiple payment dates on a single report. Go into your Folio search page and select Deposit Pending as the report type. Enter your date range and use the Reztype Filter to only look for your paying folios (If you include owner/owner guest reservations the report can get very messy indeed with FAR too much data.)
Here is an example for our New England clients, who will benefit most from this report.
Enter arrival date of say Jan 1 to Dec 31. Select ONLY "Regular" (or whatever you call your normal paying reztype), select Deposit Pending report and run the report.
You will get a report that has columns for the usual rent, payments made, amount due and also columns for the amounts and dates of payments one through four.
Very useful report if you do multiple payment plans with clients - and it can also be quite useful for those who have a two-payment rule. Try it, I think you might find it handy.
Editing Report Columns Watch a "How To" video by clicking HERE
Many Folio type reports can be modified to give you more relevant data. Here is an example of a typical Folio Report, using Arrival dates as the criteria. As you can see, you have columns like Unit Code AND Property Name. If you do not use unit codes, rather take them out of this report and put something more useful into their place.
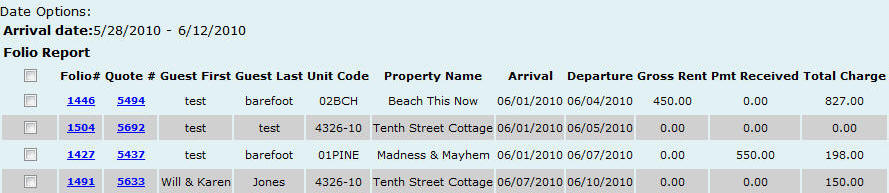
Several search results and reports can be tailored to your needs, showing data that is of relevance to you.
Go into the Catalog, and click on Edit Search Result Fields in #3 in the second section. That will bring up a database looking something like this
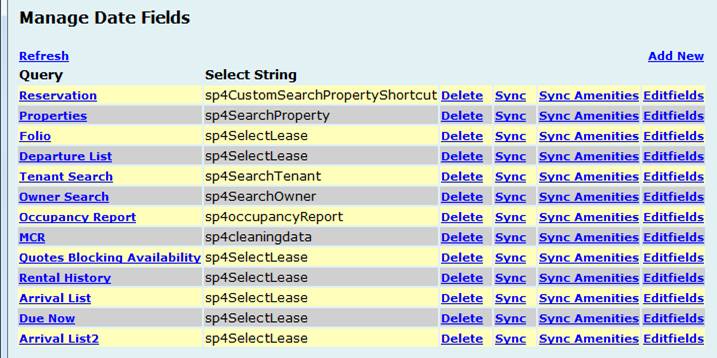
The idea of editing these fields is to remove unwanted columns and put into the search results columns you need to help you manage your business. For example, editing the Folio Report.
Click the Editfields on theFolio line and it will bring up the list of available fields and show the fields that are currently in the report now.
For example, editing the Folio Report. Click the Editfields on theFolio line and it will bring up the list of available fields and show the fields that are currently in the report now.
Two very important concepts - after you have clicked the Editfields button and are IN the search result editor.
1. To remove a field from the report, click on the field and erase the NAME of the field (leave it blank) and set the Display Index to be 10000.Save it and it will move it out of the used fields into the unused
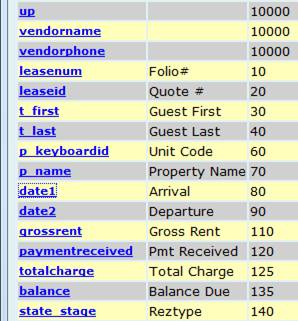
Work orders are a good simple place to keep track of everything that needs to be performed with regard to maintenance of a unit. You can search for different types of work orders, Open or Closed or any stage in between. Assign them to specific people or departments, invoice charges to properties or even tenants and even keep all relevant documents/files in once place.
Typical scenario would be for front desk to take a call from a tenant about some maintenance issue. Front desk would create a new workorder, assign a priority and assign it to the relevant person (say the maintenance manager). He would get the WO and make the necessary decisions how to handle it. He could print out the WO and give it to Joe to go investigate the red-wine stain the carpet (for instance). Joe takes a digital camera with him. Gets to the unit and photographs the damage. Cleans it or realizes that this is too big a job, needs outside help. He notates the WO. Once he gets back to the office, he can upload the pictures (or quote, letter, whatever) to the WO, update the notes and assign it to someone else – maybe to accounting to have them bill the owner or tenant. Easy. There are full search functions within the WO as well as different categories of WO for you to manage.
The "Full Circle Concept" of the Work Orders.
When you create a WO, it is in "Request" mode. The key to success with
work orders (aka, making sure that none slip through the cracks) is to have
a process in place that is consistent throughout your office and staff.
With that in mind, the process I recommend is that when a staff member
creates a WO, they assign it to the "Maintenance Manager" or whoever is
responsible for that WO getting done. THE FIRST THING this person must do
when notified that they have a WO assigned to them is to CHANGE THE STAGE to
"In Process" and add notes. That tells the creator of the WO
(and anybody else) that the assignee has SEEN the WO and has a plan to get
it done. (If the WO is still in "Request" mode a couple hours/days later, it
means that nobody has put eyeballs onto that WO and nothing has been done.
Not a good situation).
When a WO is assigned to someone - they will be emailed to this effect, so there is no excuse for them not knowing that a WO has been created or updated and assigned to them.
Each time the WO is touched, a note should be added. Too many notes is better than too few. After the work has actually been done, then the WO can be set to "Accounting" stage and assigned to the person responsible to invoice the property or tenant. After invoicing, the accounting person can either complete (aka close) the WO or bring it back full circle to the person who created it so they can contact the tenant or owner to advise that the work has been completed and make sure they are happy with the work. That person can then complete the WO and set the "Assign To" field to be blank.
A word about the URGENCY of a WO. We generally have four urgency
levels - Low, Medium, Severe and Critical. How you use them is up to you,
but I would suggest that a "Critical" WO only be created in extreme cases
where life or property is at immediate risk. It would be the kind of thing
you would haul someone out of bed at 3 am to handle - yes, THAT urgent.
If it can wait until the morning - it is not a critical issue.
Invoicing from a WO. Easily done IF you are invoicing the property. At the bottom of the WO you can easily create a new charge to the property. If you need to invoice the tenant you can simply go to the tenant folio and invoice them from there, adding a note to the WO that you have done so. Easy.
A new function we have just added is the ability to TRACK the invoices created or modified in the WO. Up on the top left of the WO is a drop-down field and you can open "Comments" to see who invoiced what and when. Nice tracking and accountability function.
Reminders
Reminders are a great way to do ‘mini work orders’ if you will. They can be created from many places and will take you back to where they were created when you open them. For instance, if you created a reminder in a folio, then it will take you back to that folio.
The concept of reminders is easy – to jog your memory to perform a specific task on a specific date. They are NOT hour sensitive, so don’t expect them to pop up at a certain time during the day. Your open and overdue reminders will be the first thing on your screen once you log in. You can also get to and search for reminders by hovering over My Info and clicking on My Reminders.
Once
you have completed the task, you simply Process it to close it and be done with
it.
Note. Only the person who created the reminder can edit it. So if you assign a
reminder to yourself and then need to add notes or change the date, easy. If
you assigned it to someone else, all they can do is process it.
Examples of how to use this great function. USE IT… It can be an outstanding tool.
You have a VIP arriving to stay. Front desk might create a reminder for the owner to meet this VIP at the airport on their arrival day.
Maintenance goes into a unit to change out a smoke alarm battery. They simply create a reminder in the property page (where they noted the comment that the battery was changed today) to do it again in six months time.
Owner Relations person might create a reminder to call an owner in 3 weeks time when they get back from vacation to discuss insurance or something.
There are many applications for reminders. We strongly recommend you get your staff into the habit of using the every single day. They can elevate your level of customer service to all-time highs.
iLink –
Online Bookings made easy
iLink is the online booking engine that integrates with Agent. There is a live feed of data between Agent and iLink, giving clients real time data and availability.
Generally speaking, Barefoot hosts the booking engine on the same server as Agent, making the iLink booking engine to mimic your website. Your logo, background and links will appear and most guests will not even realize that they are no longer on your domain and are now in a Barefoot domain.
Of
course, the online booking engine is secure.
What do you need to get your iLink up and running ?
We need a copy of your website template, along with a list of the amenities you wish to use as search criteria. We then build the booking engine to have the same look and feel as your website (within reason).
An
optional service is to have a “Quick Search” on your main URL. See
www.myrtle-beach-resort.com for
an example. This optional service can drive extra bookings your way and in many
markets, having a booking engine on your front page is a must-have.
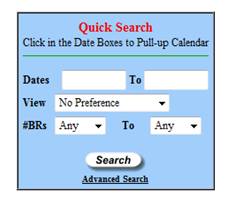
Guests would enter their arrival and departure date along with basic search preferences (like view, hot tub, pet friendly etc) and then search. Search results would bring up only available units.
Note.
In Agent, it is easy to find existing folios. Click on Folios and enter your search criteria. There are many standard reports in Agent that you will find useful.
Bookings that come in via iLink generally have the reztype “Web Booking”. This allows you to instantly see what reservations have come invia iLink so you may take appropriate action and send out necessary correspondence. As a matter of standard business practice, Agent will email the new tenant a folio confirmation upon completion of a successful booking. Many agencies request to be copied on this confirmation so they have an email notification that a web booking has taken place.
Generally speaking, web bookings have the same or essentially similar rules to regular bookings, but has some added functionality whereby you can offer a guest a discount for booking online. Please contact your Barefoot rep to discuss this.
Once
we have created the iLink booking engine, we will email you the URL for you to
embed into your main website as either an I-Frame (like
Once you have received a booking and found the booking in Agent>Folio Search, you may then easily send out custom letters to the tenant quickly and easily. Simply click on the letters drop-down menu on the bottom left hand side of the folio, select your letter and click the envelope “Send Email” icon. Barefoot will then format that letter to the specifics of the folio and all relevant information and email that letter out to the client. Of course you can open the letter, print it and fax or mail it too.
Tip.
Keep your search criteria to a minimum to keep things simple. Too many choices often can scare a guest away – after all, they may not know your units and area and may be overwhelmed by too many choices.
iLink
is designed to be fairly simple, robust and functional. We avoid the use of Flash,
Java and similar tools to keep the booking process as simple and clean as
possible. The result is a robust, easy to use, secure booking engine that
provides an ample level of trust to most web visitors.
Credit
Card Processing.
Barefoot has the capability of passing a credit card payment from your tenant (via Agent or iLink) directly and automatically if you use one of our partner vendors.
Barefoot works with three credit card merchant account providers (at this time, things can change).
We currently work with Vacation Rent Payment, Easy Pay and Heartland.
Easy Pay - Contact Jim Turner -
877-715-7166
Vacation Rent Payment – Contact John Guerrero - 866-289-5977 x 266
Heartland
– Contact Anne Mellin – 888-458-9712
anne.mellin@e-hps.com
Important note. Should you choose Heartland, please ask them to explain the “Auto close” option. You can either have this turned on or off. You will need to specify your choice when setting things up with them.
Credit
Card Security. Barefoot does not store the card details on their server. They
forward the card details to the credit card provider. This is to comply with
PCI rules (Industry standard rules).
Couple these tasks with a reasonable timeline and we can project a decent “go live” date.
Concepts.
There are (broadly speaking) a couple of types of things that have to occur in a setup.
1. We have to setup the business rules the way you want them
2. You have to be trained on many various aspects of the system. This is what this document is all about.
3. There are numerous ‘issue-fixes’ that have to be handled – where things just don’t work as you need them – whether by a miscommunication or a problem within the software – whatever the cause, there are in most cases, many little items that need to get tweaked and changed around. These issues are usually handled by your account representative and support – its not generally a training issue.
4. Many items you need to complete. For instance. Letters need to be written. Properties need to be set up. Rates need to be set. Pictures of properties need to be uploaded. All items we generally need you to perform. (That said, we CAN do data porting, which will automate a lot of the property setup. Talk to your account rep about this.
Here is a typical scenario of what needs to happen once a contract is signed and business rulesare in.
Account is opened. Barefoot does input of basic business rules and setup.
Training Session One – 2 hours. General Navigation.
Training Session Two – 1 hour. Property, owner and Tenant amenities. Then you need to set your amenities. Expectation is approx 4 hours to get your amenities set.
Training Session Three – 1 hour. Property Setup and Rate Table. Once amenities are perfect, Owner and properties need to be inputted and rates set.
Obviously this takes a while and is determined by how many properties you have. An estimate of15 minutes per property is not unreasonable. (Amenities, descriptions, pictures, rates, provisions).
Training session Four – 2 hours, Letter creation. There are certain “mission critical” letters that need to be written and made perfect. Estimate of one hour per letter is not unreasonable.
Training session Five – 2 hours. Folio creation, concepts and testing. This is a critical step. In the delivery and setup of your software, this is the NUMBER ONE most important part. It is IMPERATIVE that the rules get tested, tested and tested some more. Estimate of 5 hours for you to thoroughly test your rules.
Note. This is where a lot of ‘tweaking’ usually occurs. We set something up to the best of our understanding, but it doesn’t work the way you want. We tweak, you test. We tweak some more, you test – until we are at 100% accuracy. THEN we move to then ext step.
Ok, so right now you have completed folio testing. You should be competent and confident with navigating around the system. A sentence like “go into the catalog and do ….”should not fill your heart with dread. If you have ANY doubt about how to do something – ASK and get trained.
Folio Creation. Now that your rules are perfect, you can now input your current and future folios.
Training Session Six – one hour. Folio input. Obviously how long it takes you to input your folios is determined in part by how many you have. Ten minutes per folio is not unreasonable.
iLink Setup. Not much training to do with this. Liaise with your account rep and support as to what search criteria and format you want for your online booking.
Going Live.
Ok, so all your folios are in, payment is received where appropriate and you and your staff know your way around the system.
Now you can go live. The big moment is here. PLEASE make sure you are confident in the system. Each person learns at their own pace. We DO NOT KNOW how well you absorb information. Ask questions of us if you are unsure of something.
Three weeks after you go live.
Training Session Seven – two hours. Accounting Training. Prior to sending out your first property and vendor statements, we need some live data on hand – so doing accounting training before you go live is pointless.
Odds and Ends Checklist. Sundry stuff that needs to get done. No specific order.
Company Logo and name needs to be uploaded.
Provisions need to be set and added to letters.
Minimum Day Stays need to be configured.
Website template needs to be sent to Support
for the iLink creation. .
Portal setup and training
Work Order Training
Setup Checklist.
This is meant to be a non-exhaustive checklist.
Each client may or may not have additional items that should be included in this check list. Things like Custom work or special configuration will not be in this list.
It is your responsibility to follow up and make sure each item is completely successfully handled.
Your account is now opened. Hopefully you
know your way about by now. Learn how to manage Tabs !! This will be very useful
once you are live in the system.
While you are doing the items below, Barefoot will be setting up your business rules and account structure, doing any custom work as required.
Then, your role is to have the following completed in a timely manner. NOT necessarily in this specific order.
This check list also assumes no data porting will occur. Speak to your rep about that if you think you would like to import data from your old system.
Check List Notes.
Write your template letters. (Note, many samples are there, but make your letters PERFECT. Trust me, its worth the time investment to do so)
Send Support your website template for iLink creation, along with your desired search criteria
Discuss with Support with documentation you wish to send out automatically with an iLink booking.
Test your iLink
Enter your existing and future folios, receiving payment into Barefoot as required
Once the above is all done, you are ready to go live.
Check List
Please review each item and ask for help if you are unsure as to what to do. The truth of it is that the better the system is set up - the better it will work for you in the long run.
- Setup users. Define starting page, change passwords
- Set up owner custom fields
- Set up tenant custom fields
- Set up property custom fields
- Set up vendors, assigning services to each as you go
- Add owners
- Set Co-Owner if any
- Set who to pay, owner primary or secondary contact info (in Owner record)
- Add properties, setting descriptions ,pictures, amenities
- Set rates, either in catalog or property by property, service by service
- Get basic template letters created and edited.
- Set company reply-to email
- Complete Folio Testing. Make 100% sure EVERYTHING is correct
- Verify that ALL reztypes are working 100%.This is
- Upload office logo
- Send Support your website template for iLink creation, along with your search criteria
- Test your iLink URL
- Create your current and future folios in the system, receiving payment as needed
- All existing and future folios get entered, receiving payment as needed
- Activate Credit Card interface (sign up with company if necessary)
- Test Travel Insurance XML feed
- Get up any Portal Company agreement, enter properties, test XML feed
- Go LIVE in Agent.
- Embed iLink URL into your website
- Approximately 3 weeks later, do accounting training and first batch
Owner Fund - AKA Reserve Fund
The reserve fund is set up in order
for an owner to have a working balance that can be used if there is not
enough income in a particular month in order to pay some specific
owners’ bills. You can increase the fund, or
decrease the fund, depending on your needs, as well as adding funds to
the owners account at any time. This
needs to be set up for every property.
One key process to remember is that the Reserve Fund is
actually an expense to the owner.
You are taking money “from” the owner, and putting it in the Reserve
Fund. This might take some getting used to.
THE
RESERVE FUND FUNCTIONALITY PROCESSES ONLY WITH A “RECORDED” OR “CLOSED”
BATCH. AN “OPEN” BATCH WILL NOT PROCESS ANY
RESERVE FUND FUNCTIONALITY.
Instructions to set up
Reserve Fund(Owner’s Fund)-make sure you have talked to your Barefoot
support staff to make sure the functionality is set up:
1. First task is to set up the maximum amount of funds to be used in Owner Fund:
a. Go to property, and to the rate page for that particular property:
a. Find the owner fund on the right hand side of the rate page, and click on the “+”
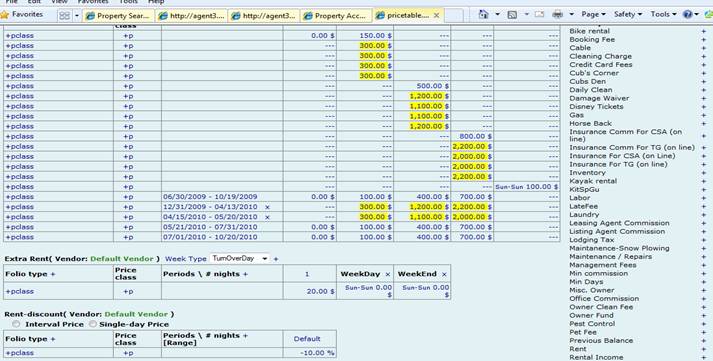

Click on the vendor for the owner fund-in this example, the Owner
Fund is vendor #137. Now go to the owner fund box on the left hand side,
and enter the total amount of the maximum desired on the owner’s
account. THIS
AMOUNT CAN BE INCREASED OR DECREASED AT ANY T TIME.
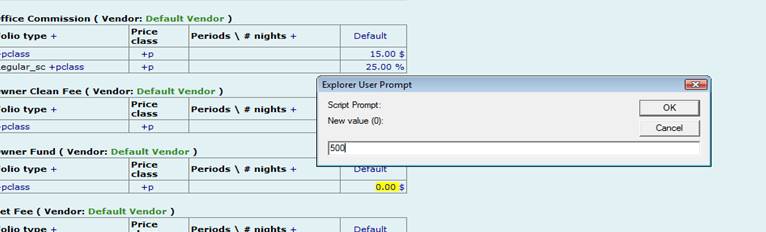
The result should look like this:

Adding INITIAL revenue to
the reserve fund:
1. Go to the specific property account page. You can add funds to the owner balance either by receiving payment, or by batching a property statement with funds that are due to the owner. It will look similar to this:
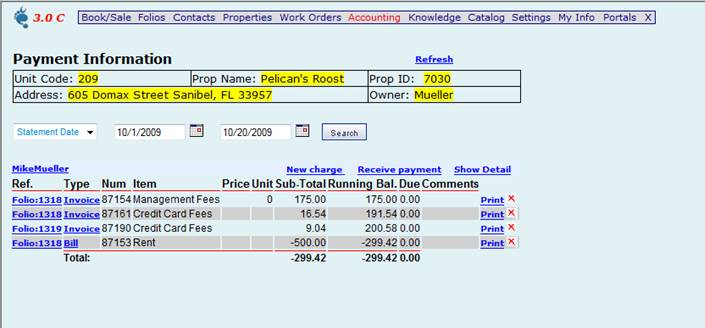
2. You now need to receive a payment from the owner.
a. Input the correct amount, and make sure you have the right date that you want the transaction to process. Update the transaction, and the process will be complete.
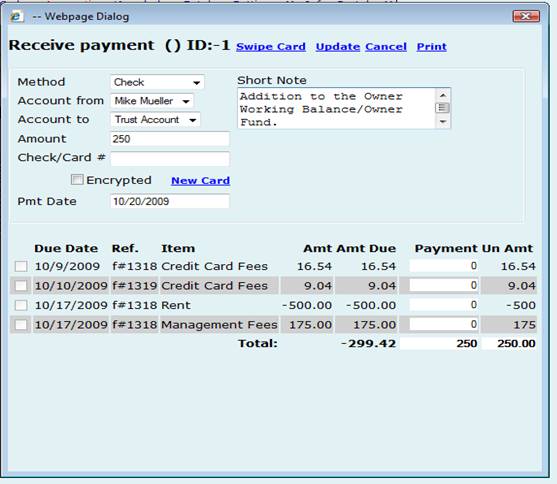
3. Note the payment made on the property account page with the notation of the “Payment for checking reserve fund”. The Property Account page should look like this:
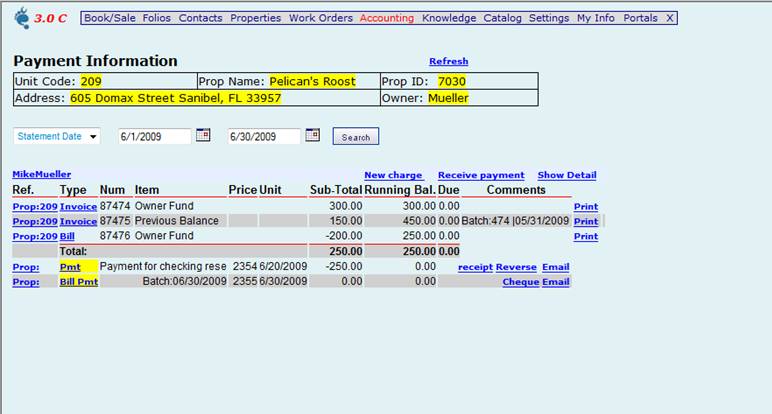
When you RECORD the batch, you will see the Reserve Fund balance from the PREVIOUS month. When you CLOSE the batch, any changes of Previous Balances, or Forward Balances that are affected by the Reserve Fund will take place.
Creating initial balances of
money owed to the management company:
1. As before, go to the Property Account page:
a. Click on New Charge. Remember that the owner is creating a debit to the property management company. The Service must be Owner Fund, and the Vendor must be the Operating Account. Make sure your dates are correct. This should look like this:
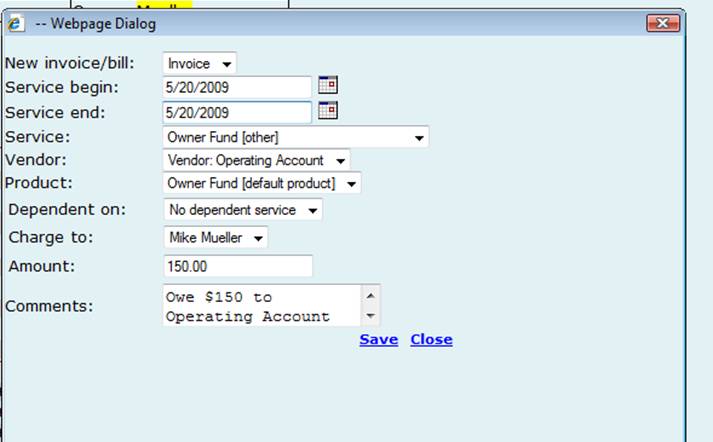
And the property page will look similar to this. Note the charge:
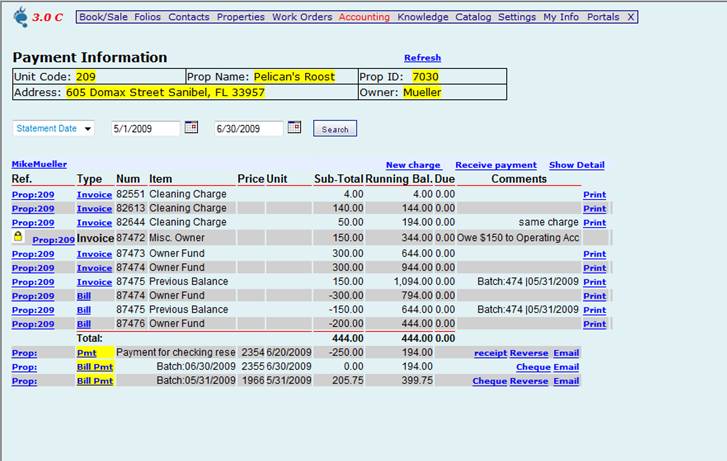
The system will automatically pay money into the reserve fund when the fund goes below the maximum balance. The fund will be added to only after any balances have been paid.
If there are balances that need to be paid, the system will pay from the reserve fund as much as possible. The rest will become a balance forward to be paid from any income from the next property batch statement.
The Reserve Fund Report:
It is important to be able to know information concerning the reserve fund: What is the maximum amount allowed at this time in the reserve fund. How much is currently in the fund, and how much is needed to replenish the fund to its maximum. This fund will show you activity for the fund for the dates chosen. It will show you the current amount in the fund, and will also show you dates that fund maximum balances were changed.
Go to ACCOUNTING>>>>REPORTS>>>>>RESERVE FUND REPORT.
Choose your dates and any other additional filtering/sorting information:
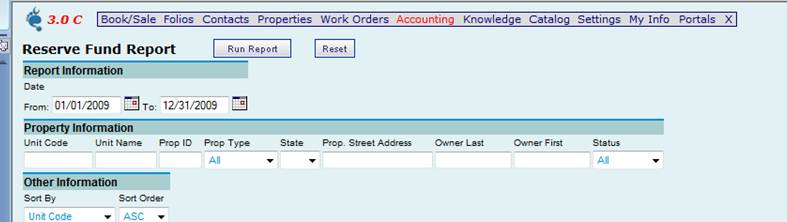
The results for Beach House, which is
what we have used for demonstration purposes here, are as follows:
THESE RESULTS ARE BASED ON CLOSED PROPERTY
STATEMENTS. THIS REPORT WILL NOT UPDATE
WITHOUT THE
PROPERTY BATCH BEING COMPLETED AND CLOSED.

We have some detailed "How To" documents - mostly advanced stuff. You can get into them by clicking on the link below.
Accounting Principles and Reporting . Advanced reports, mostly for North Carolina users
RANAS 101 - How to set up a partner vendor to offer your properties on their website.
If you require your guests to
sign and return contracts, this is the tool for you. Eliminate the need
to keep thousands of paper documents. Shorten the time between creating
the contract and sealing the deal - in many cases down to minutes
instead of days or weeks. Contact us if you are interested in this
functionality.
There is an entire "Docusign 101" document that lays out the steps to
create and use Docusign letters. This will be emailed to you when you
sign up for Docusign.
Please contact your Barefoot sales rep or Support if you would like to add this service to your account. It is an optional and billable service. You would also have to establish pricing and an account with Docusign.
Why
is there no real accounting training in this document ?
Accounting is best trained
when you have some real data to work with. This training guide is more designed
to get you through the setup process to the point of going live.
Optional
Services.
Barefoot has many customizable
pieces along with optional services like RAN and Owner Network, to mention only
two. Talk to your rep to discuss how you can use Barefoot not only to improve efficiency within your
office, but ALSO how to use Barefoot to get more bookings.
Custom
Work.
Do not be shy to ask if Barefoot can be made to do something special for you.
Yes, custom work usually costs extra, but most clients find that the nominal
charge is easily worth the investment.
This
document is a living beast. We will add to and modify it as we refine the
process and improve our system.
Barefoot Agent, being an online server-based system is subject to the vagaries and inconsistencies of the internet. Before calling for support, please verify that your internet connection is solid, fast and robust. There are several speed test websites out there, but the most consistent we have found is at www.speakeasy.net/speedtest.
Q: How do I send an owner their
statement via email?
A: Emailing a
statement (Property, Vendor or Tenant) is easily done from the Batch.
You are actually emailing a letter to the Owner (Vendor or Tenant)
with a link to their statement.
To email an individual statement to
the Owner, follow these steps:
a.
Go to
Accounting>Batch Management
b.
From the search
page:
i.
Select the Statement Type:
Property
ii.
Enter the Statement Date in both
fields (i.e. 07/31/12)
iii.
Click on the “Lookup” hyperlink to
select the individual owner (using Last Name, Unit Code, etc.) and click
“Go”
iv.
Click on the correct property in the
“Account Look Up List” box. This
will populate the Account ID field.
v.
Click Search
2.
Click on the
“List” hyperlink for the correct batch.
This will open the Statement Account List for that batch.
3.
In the Statement
Account List, click on the ID check box for the correct property statement.
4.
Check the
dropdown box to make sure the “Owner Statement Letter” is selected.
5.
Click “Email”
6.
A script window
will open. You can change the
“reply to” email if necessary.
When correct, click “OK”.
You can
choose individual properties to send this email to, or you can click on the
check box for “Select All” to send to all properties in the batch that have
an email entered in the Owner Info page.
Q: I posted a payment to
the wrong folio last month. How
do I get the money to the correct folio?
A:
You will need to “transfer” the payment.
To do this you need to create a “Pay Out” from the guest on the
original folio using the Payment Type “Transfer”. We suggest adding a
brief explanation in the comments like “Trs to folio 123456 – payment
applied in error”. Then, you will go to folio 123456 and Receive
Payment, also using the Payment Type “Transfer”. Once again, we
suggest adding a similar comment.
The reason you use the Transfer Payment Method is because it does
not affect the actual cash bank account. The money is not actually
leaving the bank account, so it shouldn’t in the software either.
You should always run a Payment Transaction report at the end of
the day, searching only for the Transfer payment method to make sure that
you have always entered both “sides” of the transaction.
A: Same as the item above - you will need to
transfer the payment to the other folio.
Instead of actually
refunding the tenant actual money, simply use the Pay Out function and
method of "Transfer". This keeps the money in the trust account but then
allows you to receive it (again, as method of transfer) into the other
folio.
Tip. Enter the folio numbers in the pay-out comments to help you
keep track of where the money went. "Transferring to Folio XX" in the first
folio and in the new/next folio do something like "Transferred from Folio
YYY"