
There are several reports that should be run monthly in preparation to doing your Property and Vendor accounting.
1. No Due Date Report.
This report should be run at least once a month to catch any money that might be
in the trust account that SHOULD be paid out.
Remember, as a general rule, a payout date on a Bill only gets created once
there is money paid in to cover it. However, these bill dates are governed by
the payout rules and can also be manually overrided or removed. If a
service is set up incorrectly or a due date is for whatever reason removed, that
money could sit in the Trust account and never be paid out. Go to Accounting >
Reports > No Due Date Report and run it for folios that have a zero balance.
Run this report and fix any problematic folios you might find. Frequently you will see multiple folios with the same service that is causing problems. Fix the due date rule of that service to eliminate future problems. (Contact Barefoot Support for help if need be).
2. Payment Mismatch Report.
This report is designed to help you find any folios where the invoice and the
bill are different. For instance, you might have invoiced a tenant $300 for a
service. The tenant paid, but for whatever reason the bill amount is different.
See screenshot for an example.
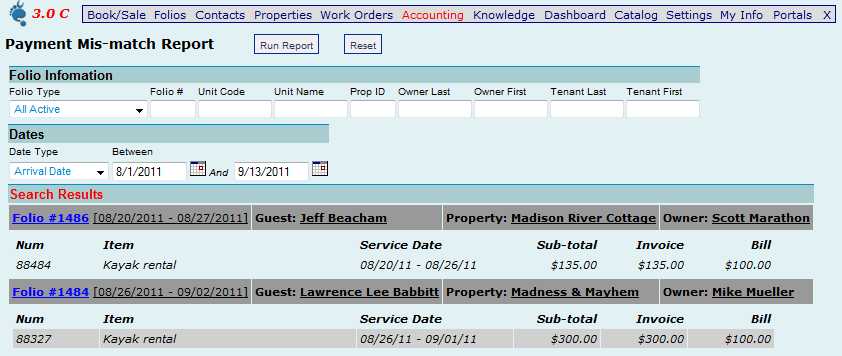
Fix the folios you find before continuing. If there is a common service like in this example, there is likely to be a problem with the Pay-Out rule.
Now that you have run your two reports and fixed any problematic folios you can now run your basic accounting batches.
Generally speaking, you can run your batches as often as you want. In practicality, most clients will pay their owners and vendors once a month.
There are 3 steps to the batch. Create an OPEN batch and check your data, if good, then RECORD the batch and assign check numbers or create an ACH file and then CLOSE the batch. Print your checks and then print your statements after you have closed the batch.
The reason you do batch management in the first place is to capture ANY revenue and expenses that have occurred to the property or the vendor (or tenant). For property batches there are frequently cases where the owner owes YOU money. When you close the batch that money will automatically be carried forward to the next batch.
Any payments made by an owner may be received in the property account at any time. They will be reflected in the next batch.
Accounting procedures for paying both properties and vendors:
The way most folks do accounting/month-end in our system is via the Batch
process. The concept is easy. Simply put, the system looks at all monies that
have to be paid out since your last batch (Bills), lumps it into one statement,
deducts monies owed (Invoices) and gives you a total to pay the owner or vendor
or tells them to pay you if in arrears.
Generally speaking, most folks pay their owners and vendors once a month, but
you CAN create batches and pay vendors and owners out as often as you want.
Mostly, you are going to create two batches – one for properties (owner
statements) and one for vendors. Remember, we consider YOU, the Agency, to be a
vendor.
So, how does this all get done ?
Go to Accounting>>>Batch Management. At this point you will have some options:
1. You can search for existing batches, you can create a new statement, or you
can search for data in a specific batch.
Let’s look at the search functionality:
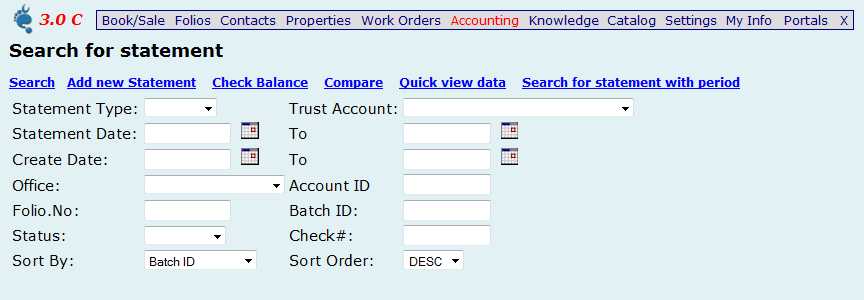
a. Using the above screen, you can search for different statement types,
typically, property batches, vendor batches, and tenant batches.
b. You can search by dates, status, and sort by different functionality.
c. In the property batch, you can search by property information, in the vendor
batch, you can search by service, or specific vendor, or you can search in a
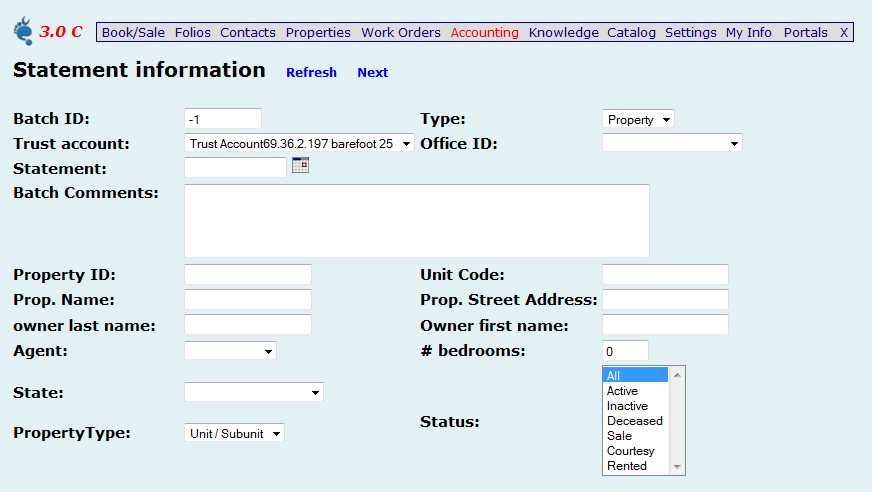
tenant batch for individual tenants. To create a new batch, you will click on
the icon Add new Statement. At this time, you can determine the type of batch
you would like to create. Your options will generally be a Property batch, a
Vendor batch, and a Tenant batch. When creating batches, all transactions with
DUE DATES that have not been batched in the past, statement.
Property batches: You can see in the page below, you can search and sort in many
different ways. Make sure you have the correct statement date you want to manage
the statements:
Once you have determined the dates and any other sorting criteria, you will
click on Next, and get the following example of results. This is considered an
OPEN batch.
It is nothing more than a snapshot of the transactions that have taken place
within the batch. NO ACCOUNTING has taken place in this batch
up to this point.
What about the tabs on top of the page?
1. Remove Batch: You can always remove an OPEN batch.
2. Statement: This tab will get you to the individual statements to look and
make sure they are correct.
3. Statement Summary: Each statement has the details, and a summary of the
transactions. This tab gives you the summary of each property’s transactions.
4. Batch Summary gives you the summary of all the batched transactions, both
income and expense.
5. Statement report view, and balance summary are some advanced functionality,
and not necessary at this time.
6. Record Transaction: Once you are confident the statement reflects accurate
information, you can record the transaction. That will trigger accounting
transactions to take place.
7. Create ACH File: This is what you create ACH File for automatic deposits for
owners.
Here is an example of an OPEN batch:
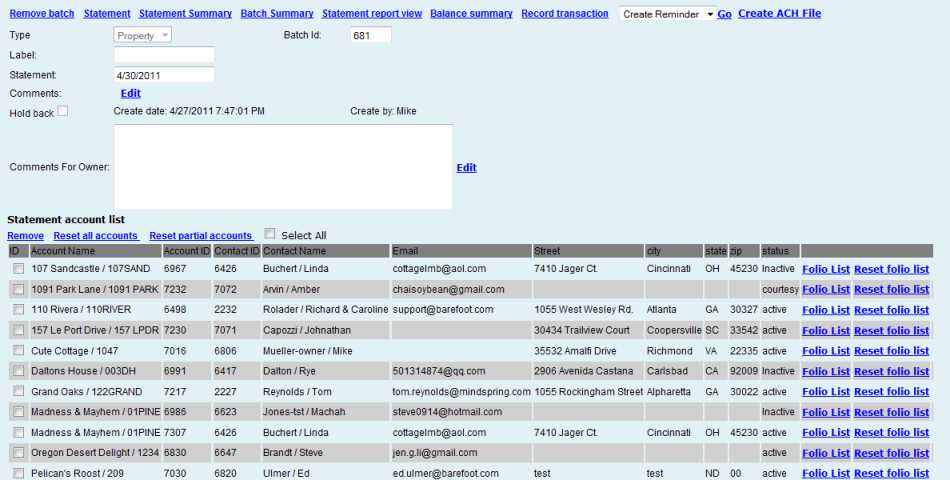
What can you do with this?
a. If you click on the Folio List, you will be able to exclude any folios or
property transactions that you may not want to include in this batch. If you
click on Reset Folio list, you will reinstate any folios that might have been
removed.
b. You can remove a property from this batch if you want.
c. You can Reset partial accounts which will allow you to select certain
properties and reset any transactions that either have been removed, or have
been changed or added since this batch was created. In order to do this, you can
select certain properties, and click on the Reset partial accounts tab.
d. You can reset ALL accounts that have transactions associated with them
according to due dates and business rules by clicking on the Reset all accounts
tab.
Let’s look at a typical statement from an OPEN batch:
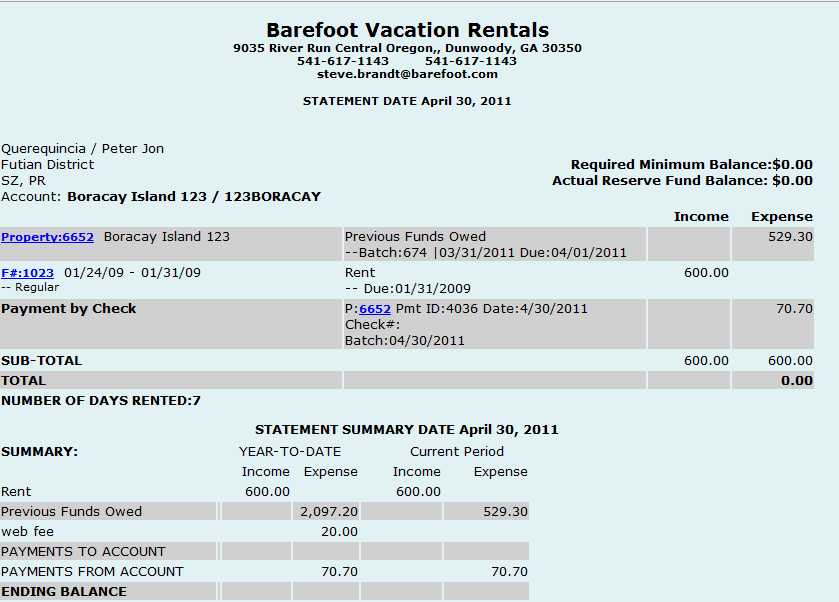
1. If you have a folio in this statement, you can click on the F#:1023, and will
take you to the specific folio.
2. Likewise, when you see something like P:6652, you can click on that, and go
to the individual property.
3. Note the property information, including the owner name and address on the
left.
4. If you have a required minimum balance on the property, that will show on the
upper right hand side of the statement.
5. The transaction details, both revenue and expense will show, in detail on the
statement, including a payment by check to the owner, with check and batch
information.
6. The property summary will be shown, both Year-to-date, and for the current
period.
Once you are assured that the batch is accurate, you will then RECORD the batch
by clicking on Record transaction. RECORDED batches have now created the
accounting transactions. While an OPEN batch is a snapshot of the transactions,
the RECORDED batch actually causes the accounting functionality to update
throughout the system.
You cannot remove a property or a folio from a recorded batch.
IT IS GENERALLY ACCEPTED THAT ONCE YOU HAVE
RECORDED A BATCH, YOU SHOULD NOT UNRECORD THAT BATCH. IF YOU HAVE A NEED TO,
PLEASE DISCUSS WITH YOUR BAREFOOT REPRESENTATIVE.
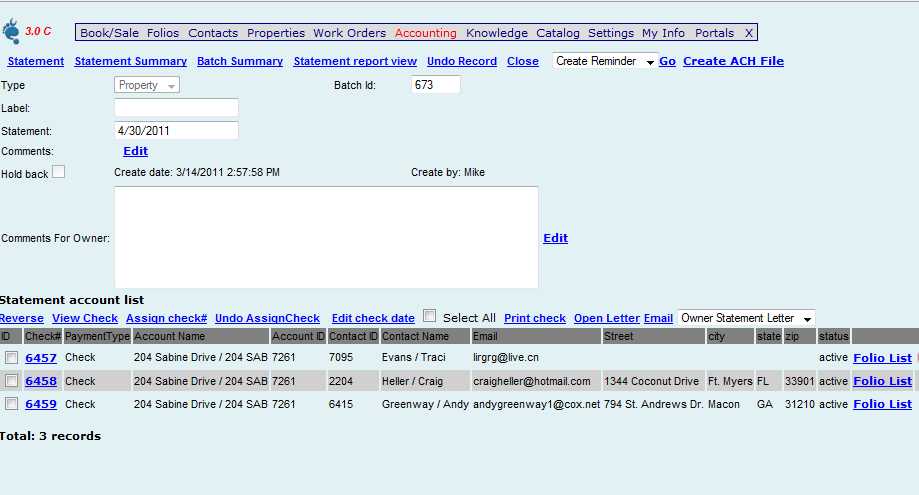
1. The recorded batch has a few different icons on the top of the page.
a. There is no Remove Batch tab.
b. You can unrecord the batch, although it is generally not recommended to do
this.
c. You can close the batch.
2. A little lower on the page there are also different icons:
a. Reverse: You can not remove a property from a recorded batch. But you can
reverse a property’s transactions. By reversing, you are removing the property
from this batch, and actually creating another batch that is marked in the
comments as being a reversed batch from another particular batch.
b. View Check: You can view all the checks in a summary fashion.
c. Assign Check#: This will show an icon providing you with the next check
number in sequence. You can choose that check number (or ACH number), or you can
choose your own check numbers individually.
d. Undo AssignCheck: If you want to remove check numbers, you can do that also.
e. Edit Check Date. If you want to have the check date to be different from the
date of the statement, you can alter that here.
f. Print check: When you are ready to print checks, you do that here.
g. If you have a letter you would like to send with the statement, you can
choose that letter and either open the letter and print, or you can email the
statements with that letter attached. You will note the ability to edit comments
for owners, and you can edit comments for that particular batch. We would
suggest that you identify each batch with a
comment, so you will be able to identify what is in the individual batches for
reference purposes.
Once you have recorded the batch, you will CLOSE the batch. By closing the
batch, you have completed all the accounting functionality necessary in the
particular batch. Print out your statements, marry them to the checks and pop
them off in the mail. (Or just mail them if you pay via ACH).
Vendor Batches are very similar in nature to the Property batches. But while
property batches are generally done once a month, vendor batches tend to be
completed throughout the month. When you click on Add a New Statement, and
choose Vendor as the type of statement.
You need to choose the statement date, and again, this date would be of any
transactions that have NOT been batched previously. You can sort by many
different criteria, including the Service ID:. Choosing the service ID would
give you specific services that you are going to pay at this particular time.
While vendor statements are functionally the same as a property statement, they
do look a bit different.
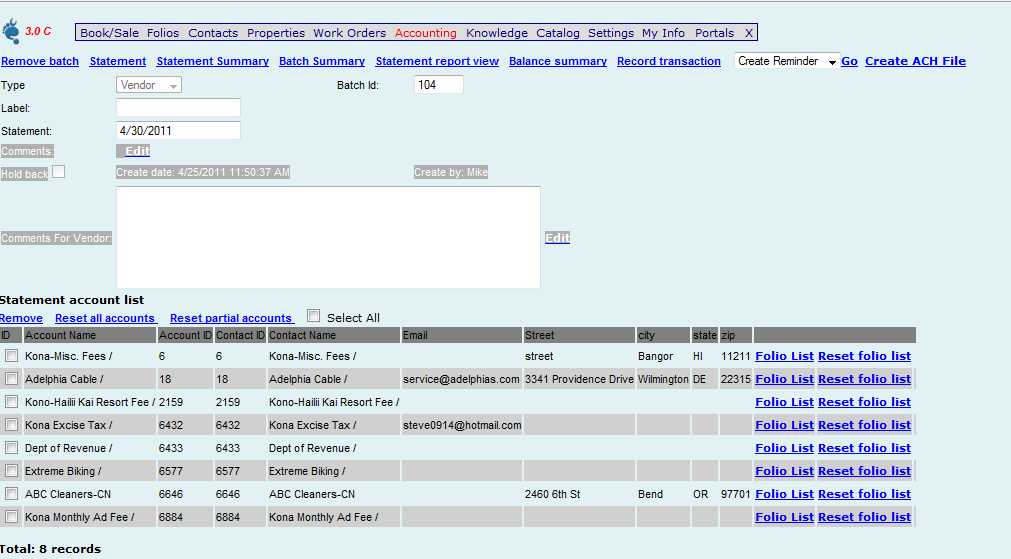
Rather than having the owner and the property information on the batch, you have
the vendors’ information. The tabs are all basically the same as the property
batch.
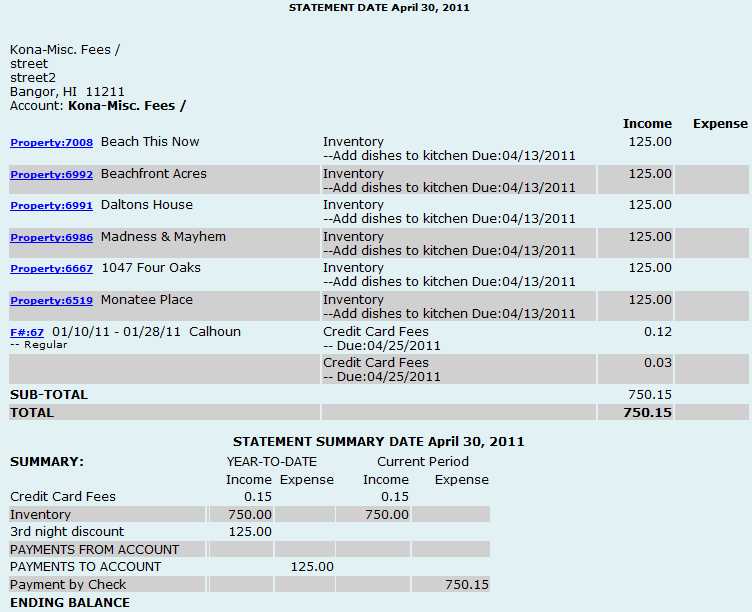
Consider this statement. You can see that there are property transactions
rather than the folio transactions. This depends on whether you have created
these transactions based on folios, or other things like work orders, or
individual property transactions. Again, you can click on the property icon, and
it will take you to the individual property so you can check your work.
Follow the same procedure as you would for Property Batches - Sanitize your open batch, record it, assign check numbers, close it, print out checks and statements. Done.
Q: I need to void a check our company issued as a payment from a batch.
How do I do this?
A: There is a specific process to follow to void a check that has been
paid through the batch process. It’s not difficult, and you do not need to
open the batch.
1.
Go to Accounting>Batch Management and search for the batch that includes the
check you need to void.
2.
Open the Statement Account List for the batch.
3.
Click on the check box to the left of the check number you want to void.
4.
Click on the “Reverse” hyperlink. This will remove this property or vendor
from the closed batch and will automatically create a new batch containing that
one property/vendor. You will see a
message stating that you need to undo the check number.
If this check was issued and lost, and you will be assigning a new check
number, do NOT unassign the original check number.
5.
Locate the new batch. You can now Record, Assign a new check number, Edit
the check date, Close the batch and Print the new check.
Once you have done this, you will see that the original check is still included
in your Payment Transaction report for the original date the first check was
issued. The amount will now be $0.00 and a description will be entered
that indicates the original amount and batch.
If you have not printed the original check, and can use the same check number,
you can Undo Assign Check prior to removing the account from the batch.
This will remove the original record of the payment in the Payment Transaction
Report. Once you have reversed the account out of the original batch, you
can make adjustments to the account and Record the new batch. At this
point, you are able to Assign the original check number, Close the batch and
print the check.
There are also some reports that you will want to use on a regular basis.
Let’s look at some of them now.
Go to Accounting>>>Banking Operations. This is the screen that you will see at
this time.
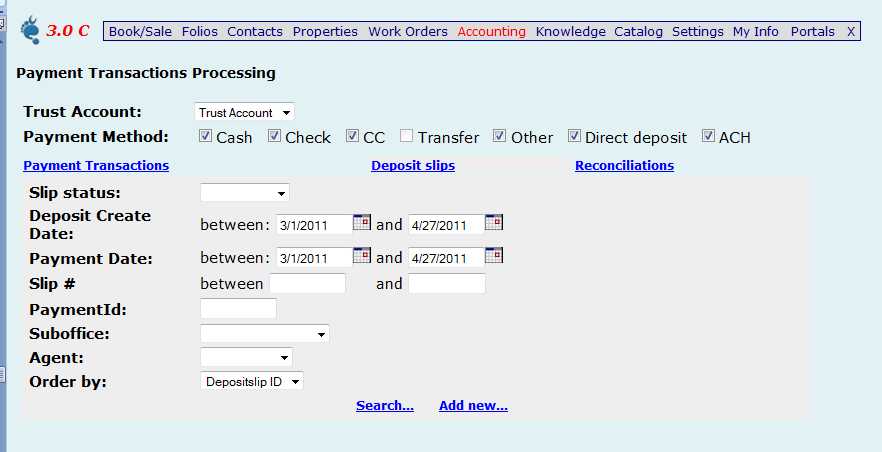
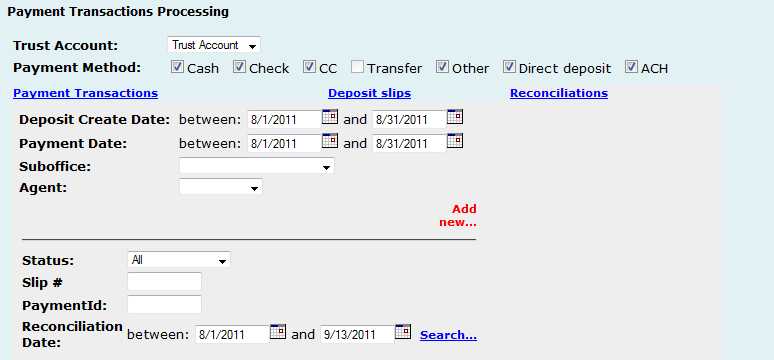
There are three basic functions in this accounting reporting functionality
Payment Transactions:
![]()
1. Payment method: You have different types of payment methods, and you can sort
which you want in this particular search result.
2. The Payment Transactions: This is where you can find the transactions that
taken place based in certain criteria. Here is some information for you to
consider:
a. Pay/Receive: You can search for both revenue (Payment received) and expenses
(Bill Payment).
b. Payment Date: Search by the dates the payments were made.
c. Arrival Date: You can search by the arrival dates for individual folios.
d. Check Number: You can search by check number
e. Reconciled: Whether the payments have been reconciled or not, or whether they
are in Deposit Slips.
f. Order by: You can also determine how you order the information: By Payment
Date, Arrival Date, Check number, or CC number.
3. You also have the ability to get a Detail Report, just the Summary
information, or export all the information to Excel.
With the results below, you can also sort by the Ref. number, Property name,
date, Payee, or the amount.
![]()
Deposit Slips:
This functionality is mainly used if you are planning on reconciling your bank
statement on a monthly basis. If not, then you probably will not be interested
in either the Deposit Slips, or the Reconciliations. This will give you a record
of each deposit into your bank account, either from your credit card company, or
from the deposits you make to the bank from your staff. So all thei following
information assumes you are going to be reconciling your bank account at the end
of each month.
Credit Card deposits: Your credit card company has some sort of transaction
report that you should be downloading from their website each and every day.
Those will be the records of the credit card transactions made into your bank.
Remember, just because the transaction is made in Barefoot, either in-house, or
over the internet, doesn’t mean that the money is deposited into your bank the
same day. It could be 2-4 days before the deposit is made. And at the end of the
month, you are attempting to reconcile the deposits made into the bank with a
deposit identified within the Barefoot system. With that in mind, you can either
create a CC deposit slip, or a deposit slip that you have with checks and cash.
Choose the Payment Method on the top of the page in order to determine which you
are going to do. If you are searching for existing deposit slips, you will need
to input the deposit create dates. If you are looking to create a new deposit,
you will need to input the payment dates. If you are creating a new deposit, you
need to choose your payment method, and then you need to set up the search
criteria. Use both date fields for determining what dates of the transactions
you want to search for if you need to make any changes.
If you are adding a new deposit slip, put in the correct criteria, and you will
get to this page:
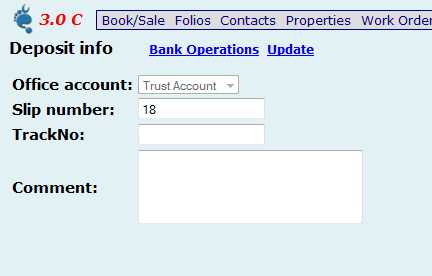
Fill out the comment with something to identify the particular deposit slip. The
tracking number might be the date, or some sort of tool you might use to track
the information.
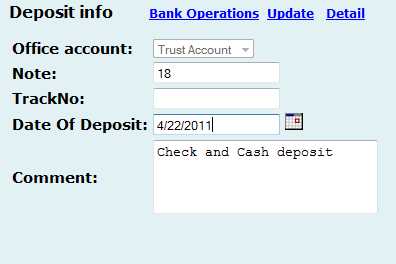
Your next screen will ask you for your date of deposit. Put in the date, Update,
and then click on Detail.
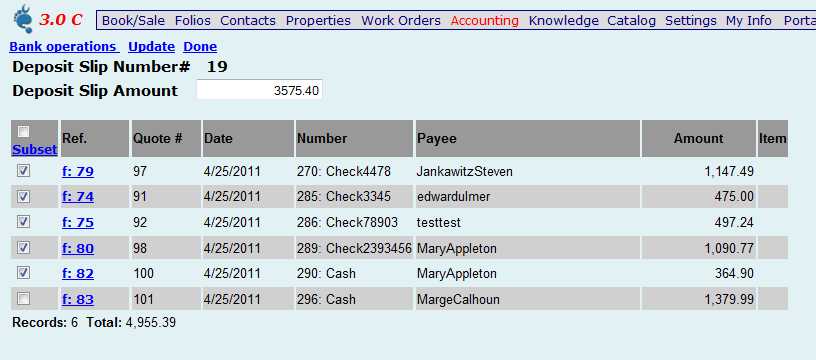
Click on the deposits that need to be included in this deposit slip, and then
Update
and Done, and you will have complete Deposit slip as shown below.
Reconciliations.
Reconciliations are done to compare your bank statement to Barefoot. To
compare what your bank says you have compared to what Barefoot says you should
have.
For instance, you might show ten deposits of $1000 each in Barefoot but only
NINE deposits in your bank statement. This gives you the tools to find any
problems or missing money.
Generally it is good practice to use the same dates as your bank statement is using. Click the Add New button to create a new reconciliation. You will get something like this.
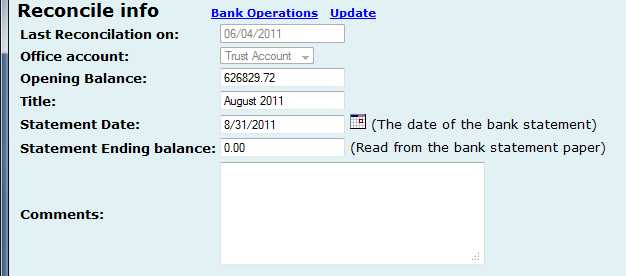
Note : Give it a title, select a statement date and enter the Statement Ending Balance from your bank statement - then click Update.
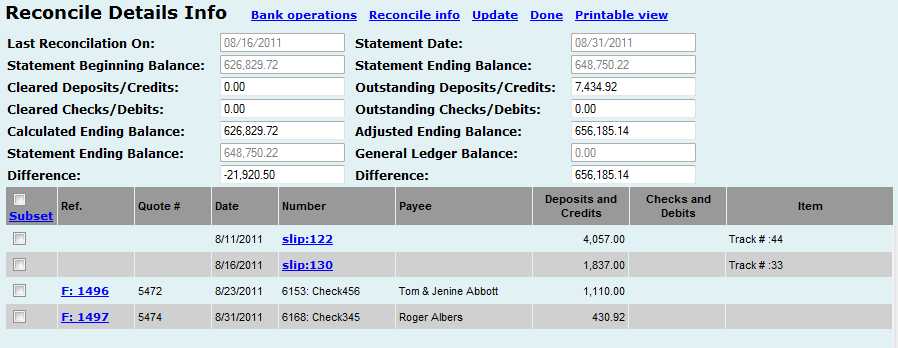
Then click DETAIL and all the transactions that have occurred within your date periods will appear. Cross reference each one with your bank statment. Each deposit will add money to the ending balance, each payment will deduct money from the ending balance.
You can update as you go - as this might take some time. Only when you are
completely done and everything matches do you click the DONE button.
Many agencies like to have miscellaneous charges like interest earned, stop payment charges and any other bank charges or deposits captured in Barefoot to make the reconciliation absolutely match. This is easily done by creating an invoice or deposit from the Bank (as a vendor) to the Operating Account (as a vendor).
If you are in a state where it is not permitted to pay a vendor if there is no money in the property account, then please contact Barefoot to enable a special functionality to prevent this from happening. Some states, like North Carolina basically do not allow you to use money that might be in the trust account, but allocated to another property to pay invoices from a vendor for services rendered on a different property.
The concept is this. Vendors and Properties should (must) always be paid out via the batch process. Before you pay a vendor, you must ensure that there is sufficient money in the property account before you actually pay the vendor.
In the Barefoot system, when a property batch is completed, all the money due to the owners is paid, leaving a $0 balance in their account. During the month, when money is paid into the system, that money must be recorded in the property batch before paying any vendor batches. (Note: NO vendors will be paid until there is enough money to pay the ENTIRE amount due to vendors in this particular batch. Once there is sufficient amount to get the particular batch to zero, all vendors due money in the batch will be paid).
If your business rules are such (or State Law dictates) that vendors are NOT to be paid if there is insufficient money in the property account, here are the steps that MUST be followed in your batch process.
There are basically two scenarios.
1. You pay your owners and vendors once a month
2. You pay vendors and/or owners multiple times during the month.
If you pay your owners and vendors only once a month, it is very easy - simply create, sanitize, record, pay and close your property batch FIRST. THEN do the vendor batch. (Create, sanitize, record, pay and close) (The property batch will deduct money to pay the vendor from the owner income and assign that money to the vendor that needs to be paid). Easy.
If you pay vendors during the month, then you have to create a property batch first and record it and close it. Then create your vendor batch, sanitize, record, pay and close the vendor batch.
There is no need to touch the property batch again at this point in time. Even though it might have allocated a check/ACH as payment to the owner, you know it hasn’t been paid out (No check number for starters). At the end of the month, open and unrecord the property batch, reset all accounts and sanitize the batch.
If you need to pay your vendors again (maybe the next week) you have to go to the recorded Property batch, Open it. Unrecord it, Reset all accounts and then Re-record and close the batch. Then create your new vendor batch, sanitize, record, pay and close.
Any time you plan on paying an owner, open the batch, reset all accounts, sanitize, record, pay and close.
The added side effect of this process is that you should
never get into a situation where an owner is in arrears and owes money TO the
trust account - as the vendor would not have been paid if there was no money in
the property account in the first place.
The switch in System > System Configuration > System
Settings is : LimitStatementForVendor.
This deals with how to capture things like Bank Charges that are posted to your Trust Account.
IMPORTANT NOTE:
All transactions in Agent must be assigned to a property for the Advanced
Accounting Reports to be correct.
1.
Set up a new owner.
a.
You can give it a last name of “Loan to Operating” and the
company name of (insert your company name).
b.
Fill in the address information if necessary for check printing.
c.
Click on the “Use Company Info” check box.
d.
Change the “Owner Check” field to “Use Company Information”
2.
Set up a new
property
a.
From the Owner Information page, select Add Property in the list
box at the top of the page and click on “Go To”.
This will create a blank property information page attached to this
owner.
b.
Enter the Unit Code of “LOAN” and Property Name of “Loan to
Operating”. You can change these if
you have wording that makes more sense to you.
c.
Make the property Inactive
d.
Enter a brief description of the use of this property in the
Sticky Comments. Example:
This is a non-rental property used to track loans from the trust account
to the operating account.
e.
Select No iLink in the iLink amenity field.
f.
Click Update.
3.
Create a new
service called “Loan to Operating”
4.
Create a new
vendor called “Operating Loan”.
a.
Give this a company name that will print correctly on a check (if
necessary).
b.
Fill in the address information if applicable.
This will need to be associated with the operating company bank account
if you are using a check to move the money from one account to the other.
c.
Add the new service from step 3 to the vendor and set as the
default.
Once you have completed Steps 1-4,
you are ready to enter the necessary transactions to show that funds have been
paid out of the system, and are owed back to the trust account.
The basic logic is that you will use this LOAN property to act as a
“clearing account” to show that money is due from the operating account to the
trust account. When you take a loan
from the trust account, you will be creating a payment transaction to the
Operating Loan vendor via a vendor batch.
You will then show an expense balance due in the LOAN property account.
When you pay back this loan, you will receive the payment into the
property account. The property will
show the correct amount held on account, or owed to the account, in the Trial
Balance report.
To Create the Loan from the trust account to the operating
account:
1
Go to the
Property Account page, or use Accounting>Post Bills and Payments to add a new
charge to the LOAN property using the service called Loan to Operating.
d.
Click on New Charge.
e.
Select Invoice (this should be the default setting)
f.
Enter the actual loan date as the Service Begin and Service End
dates.
g.
Select the correct service (Loan to Operating)
h.
Verify that the vendor is correct.
i.
Enter the amount.
j.
Add a comment if desired.
k.
Save the invoice.
2.
Create a Vendor
Batch to create the payment transaction.
This batch can be created with the same date used in step 5c, and by
selecting the vendor using either Last Name or Company.
Make sure to Record and Close the batch.
3.
Create, Record
and Close a property batch for the LOAN property.
To Repay the Loan from the operating account to the trust
account:
1
Go to the
Property Account page, or use Accounting>Post Bills to Receive Payment to the
LOAN property.
a.
Click on Receive Payment
b.
Enter the payment method
c.
Enter the amount
d.
Add a Short Note (if desired)
e.
Click Update
2
Create a
Property Batch to show the new balance on the LOAN property.
BANK FEES IN TRUST ACCOUNT (To be reimbursed by Operating)
IMPORTANT NOTE:
All transactions in Agent must be assigned to a property for the Advanced
Accounting Reports to be correct.
5.
Set up a new owner.
a.
You can give it a last name of “BANK FEES – Trust Acct” and the
company name of (insert your company name).
b.
Fill in the address information if necessary for check printing.
c.
Click on the “Use Company Info” check box.
d.
Change the “Owner Check” field to “Use Company Information”
6.
Set up a new
property
a.
From the Owner Information page, select Add Property in the list
box at the top of the page and click on “Go To”.
This will create a blank property information page attached to this
owner.
b.
Enter the Unit Code of “BANK FEES” and Property Name of “Bank
Fees – Trust Acct”. You can change
these if you have wording that makes more sense to you.
c.
Make the property Inactive
d.
Enter a brief description of the use of this property in the
Sticky Comments. Example:
This is a non-rental property used to track loans from the trust account
to the operating account.
e.
Select No iLink in the iLink amenity field.
f.
Click Update.
7.
Create a new
service called “Bank Fees – Due from Oper”
8.
Create a new
vendor called “Bank Fees-Due from Oper”.
a.
Give this a company name that will print correctly on a check (if
necessary).
b.
Fill in the address information if applicable.
This will need to be associated with the operating company bank account
if you are using a check to move the money from one account to the other.
c.
Add the new service from step 3 to the vendor and set as the
default.
Once you have completed Steps 1-4,
you are ready to enter the necessary transactions to show that funds have been
paid out of the system, and are owed back to the trust account.
The basic logic is that you will use this BANK FEE property to act as a
“clearing account” to show that money is due from the operating account to the
trust account. When you take a loan
from the trust account, you will be creating a payment transaction to the
Operating Loan vendor via a vendor batch.
You will then show an expense balance due in the BANK FEE property
account. When you pay back this
loan, you will receive the payment into the property account.
The property will show the correct amount held on account, or owed to the
account, in the Trial Balance report.
To Create the Bank Fee transaction from the trust account to the
operating account:
2
Go to the
Property Account page, or use Accounting>Post Bills and Payments to add a new
charge to the BANK FEE property using the service called Bank Fees-Due From
Oper.
d.
Click on New Charge.
e.
Select Invoice (this should be the default setting)
f.
Enter the actual bank fee date as the Service Begin and Service
End dates.
g.
Select the correct service (Bank Fees-Due from Oper)
h.
Verify that the vendor is correct.
i.
Enter the amount.
j.
Add a comment if desired.
k.
Save the invoice.
4.
Create a Vendor
Batch to create the payment transaction.
This batch can be created with the same date used in step 5c, and by
selecting the vendor using either Last Name or Company.
Make sure to Record and Close the batch.
5.
Create, Record
and Close a property batch for the BANK FEE property.
To Repay the Loan from the operating account to the trust
account:
3
Go to the
Property Account page, or use Accounting>Post Bills to Receive Payment to the
BANK FEE property.
a.
Click on Receive Payment
b.
Enter the payment method
c.
Enter the amount
d.
Add a Short Note (if desired)
e.
Click Update
4
Create a
Property Batch to show the new balance on the BANK FEE property.